Introduction
There are few things more frustrating than standing in your driveway, punching numbers into a keypad that refuses to respond, while your car sits locked inside or the rain starts to pour. If you are currently searching for how to reset a Craftsman garage door opener keypad, you are likely dealing with a forgotten PIN, a malfunctioning unit, or a home security transition. We understand that this is not just about convenience; it is about the safety and accessibility of your home. This comprehensive guide will walk you through every method to restore your keypad’s functionality safely and efficiently, ensuring you regain secure access without unnecessary service calls.
Why Your Craftsman Keypad Might Need Resetting
Before diving into the technical steps, it is vital to understand why the reset is necessary. Diagnosing the root cause ensures you apply the correct fix and prevents future issues. According to industry data from the International Door Association (IDA), nearly 40% of garage door opener service calls are related to remote or keypad programming errors rather than mechanical failure.
Common triggers for a reset include:
- Forgotten PIN Codes: The most frequent reason, especially after moving into a new home or changing household members.
- Battery Replacement: Sometimes, replacing the 9V battery causes the memory to glitch or requires re-synchronization.
- Signal Interference: New LED bulbs or nearby radio frequencies can disrupt the radio frequency communication between the keypad and the motor head.
- Security Upgrades: After a breakup, tenant change, or lost device, resetting ensures old codes no longer grant access.
- System Glitches: Power surges or aging logic boards can corrupt stored user data.
Understanding these factors helps distinguish between a simple reprogram and a need for hardware replacement.
Safety First: Pre-Reset Checklist
Garage door openers involve high-tension springs and electrical components. Before attempting any reset procedure, adhere to these safety protocols:
- Clear the Area: Ensure no people, pets, or objects are near the door path.
- Check Battery Health: Always start with a fresh, name-brand 9V alkaline battery. Weak batteries mimic programming failures.
- Inspect Wiring: For hardwired keypads, check for frayed wires or corrosion at the terminal connections.
- Locate the Learn Button: Identify whether your unit uses a yellow, purple, orange, or red learn button, as this dictates the programming sequence.
- Disconnect Power (If Needed): Only if you suspect an electrical fault should you unplug the opener; otherwise, keep it powered for programming.
Expert Note: Never attempt to adjust the torsion springs yourself during this process. Spring tension contains enough force to cause severe injury. Stick strictly to electronic programming.
How To Reset A Craftsman Garage Door Opener Keypad: Step-by-Step Guide
This section covers the universal methods applicable to most Craftsman/LiftMaster/Craftsman AssureLink systems manufactured after 2011. Always consult your specific model’s manual if these steps fail.
Method 1: The Standard Factory Reset (Clear All Codes)
Use this method when you want to wipe all existing PINs and remotes from the system.
- Locate the “Learn” button on the back or side of the garage door opener motor unit. It is typically colored yellow, purple, or orange.
- Press and hold the Learn button for 6–10 seconds. Watch the indicator LED next to it.
- Release the button when the LED turns off completely. This confirms all codes have been erased.
- Test the wall console to ensure the door still operates manually (this verifies the motor is functional).
- Proceed immediately to reprogramming your keypad and remotes, as the system is now blank.
Method 2: Reprogramming the Keypad Without Clearing Other Devices
If you only need to change the PIN but keep existing remotes active:
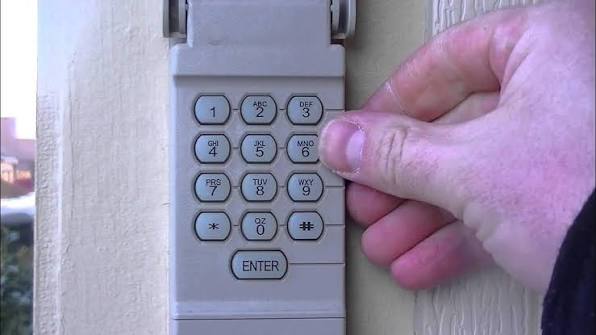
- Enter your current 4-digit PIN on the keypad.
- Press and hold the # key until the keypad light blinks twice.
- Enter your new 4-digit PIN.
- Press the # key again. The light should blink once to confirm.
- Test the new code immediately. If it fails, repeat the sequence, ensuring each button press is firm and deliberate.
Method 3: Hard Reset for Unresponsive Keypads
When the keypad shows no lights or response:
- Remove the battery cover and take out the 9V battery.
- Press and hold the ENTER button for 30 seconds while the battery is removed. This drains residual capacitor charge.
- Insert a fresh 9V alkaline battery (avoid lithium or rechargeable unless specified).
- Wait 60 seconds for the internal processor to reboot.
- Attempt Method 2 above. If still unresponsive, the keypad circuit board may be damaged by moisture or age.
Troubleshooting: When the Reset Doesn’t Work
Even with perfect execution, issues persist. Use this diagnostic table to identify solutions:
| Symptom | Likely Cause | Recommended Fix |
|---|---|---|
| Light blinks but door doesn’t move | Signal interference or range issue | Replace LED bulbs in opener; reposition antenna wire vertically |
| No lights at all | Dead battery or corroded contacts | Clean terminals with vinegar; install fresh battery |
| Code accepted, then rejected | Logic board memory corruption | Perform full factory reset (Method 1); check for firmware updates |
| Works intermittently | Moisture damage or worn buttons | Inspect rubber gasket seal; replace keypad if water-damaged |
| Learn button won’t activate | Faulty control board or capacitor | Professional diagnosis required; potential board replacement |
Pro Tip: If you have recently installed smart LED bulbs in your garage opener fixture, switch back to incandescent or “garage-door-safe” LEDs. Many standard LEDs emit RF noise that blocks the 315 MHz or 390 MHz signals used by Craftsman keypads.
Maintaining Your Keypad for Long-Term Reliability
Prevention reduces future resets. Implement these maintenance practices quarterly:
- Weatherproofing: Apply dielectric grease to battery terminals to prevent corrosion from humidity.
- Button Testing: Monthly, test all digits to detect sticky or failing membrane switches early.
- Firmware Updates: For Wi-Fi-enabled Craftsman models, check the myQ app for updates that patch connectivity bugs.
- Code Rotation: Change your PIN every 6–12 months as part of routine home security hygiene.
- Visual Inspection: Check the mounting bracket and seal integrity to prevent water ingress during storms.
Consistent maintenance extends keypad lifespan from the average 3–5 years to 7+ years, according to manufacturer field reports.
Frequently Asked Questions (FAQ)
1. Can I reset my Craftsman keypad without accessing the motor unit?
Yes, but only for changing the PIN (Method 2). A full factory reset that clears all devices requires pressing the Learn button on the motor head. If you cannot access the motor, you can only modify existing codes, not erase them entirely.
2. How do I know which Learn button color corresponds to my keypad?
Craftsman uses color-coding for frequency compatibility: Yellow (Security+ 2.0, 315 MHz), Purple (Security+, 390 MHz), Orange/Red (Older rolling code). Match your keypad’s FCC ID or manufacturing date to the opener’s learn button color. Mismatched colors indicate incompatible hardware requiring replacement.
3. Why does my keypad work for a week then stop?
This intermittent failure usually points to three culprits: poor-quality batteries unable to handle peak transmission current, moisture seeping through degraded seals, or RF interference from new electronics. Start with premium alkaline batteries and inspect the weather seal. If unresolved, replace the keypad unit.
4. Is there a master code override for Craftsman keypads?
No. Craftsman discontinued master override codes in the late 1990s for security reasons. Modern units use rolling-code encryption where each transmission generates a unique signal. If you’ve lost all codes, a factory reset via the Learn button is the only recovery method. Avoid websites claiming to provide universal master codes—they are fraudulent.
5. Can I program multiple PINs on one keypad?
Most standalone Craftsman wireless keypads support only one active PIN at a time. However, some newer touchscreen models and integrated myQ systems allow up to 4 unique user codes. Check your model number against the official Craftsman compatibility chart to confirm multi-user capability before purchasing.
6. What if my keypad is wired instead of wireless?
Wired keypads connect directly to the opener’s terminal screws and draw power from the motor unit. Resetting follows the same Learn-button protocol, but battery-related troubleshooting does not apply. Instead, verify wire continuity with a multimeter and ensure terminal connections are tight and corrosion-free. Wired units rarely fail electronically but commonly suffer from physical wire damage.
Conclusion
Mastering how to reset a Craftsman garage door opener keypad empowers you to maintain home security independently, saving both time and service fees. Whether you’re performing a routine PIN change or recovering from a complete system lockout, the methods outlined here prioritize safety, accuracy, and long-term reliability. Remember: a functioning keypad is your first line of defense against unauthorized entry and your guarantee of seamless daily access.
Don’t let a stubborn keypad compromise your peace of mind. Bookmark this guide for future reference, and share it with friends, family, or neighbors who might be struggling with their own garage door frustrations. Together, we can build safer, smarter homes—one reset at a time. Have you successfully reset your Craftsman keypad using these steps? Share your experience or lingering questions in the comments below to help fellow homeowners navigate this common challenge!



Leave a Reply