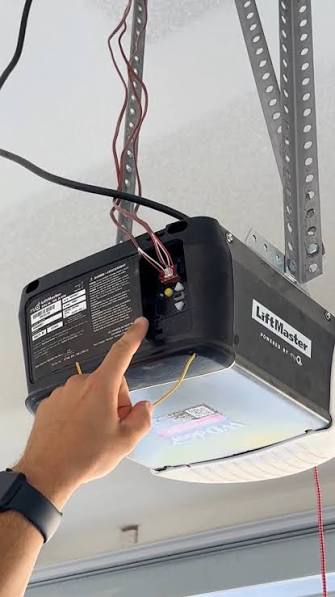
How To Set Up My Liftmaster Garage Door Opener: Easy Guide
Unboxing a new motor can feel overwhelming, especially when you are sitting on the garage floor wondering exactly how to set up my Liftmaster garage door opener without calling an expensive technician. Don’t worry, because with the right guidance, basic tools, and a little patience, you can easily secure your home and sync your smart devices in just one afternoon!
How To Set Up My Liftmaster Garage Door Opener: The Hardware Phase
Before we dive into the wiring and smart features, we need to tackle the physical installation. Proper hardware setup is the backbone of a quiet, long-lasting garage door system.
Step 1: Gather Your Tools and Clear the Space
Preparation is half the battle. According to professional installers, having your tools laid out saves up to 30% of your installation time. You will need:
- A stepladder (minimum 6 feet)
- A power drill with a 7/16-inch socket and Phillips bit
- Locking pliers and adjustable wrenches
- A tape measure and a level
- Safety glasses and work gloves
Step 2: Assemble the Rail and Trolley
Lay out the rail sections on the garage floor. Connect them using the provided bolts and nuts, ensuring they are perfectly straight.
- Slide the trolley onto the rail.
- Attach the rail to the motor head (powerhead).
- Pro Tip: Tighten the bolts sequentially, not all at once, to prevent the rail from warping.
Step 3: Mounting the Header Bracket
This bracket supports the entire weight of the door’s movement.
- Close your garage door and mark the center point on the header wall directly above the door’s highest arc.
- Position the header bracket exactly 2 inches above the highest point of travel.
- Secure it using heavy-duty 3-inch lag screws directly into the wooden header or ceiling joists. Never mount this into drywall alone!
Step 4: Hang the Powerhead
With a helper holding the rail, lift the powerhead into position.
- Suspend the motor from the ceiling joists using the provided angle iron or heavy-duty strapping.
- Ensure the powerhead is exactly 2 inches below the ceiling joist to allow for proper vibration clearance.
- Use a level to ensure the motor is perfectly horizontal. An angled motor will cause premature wear on the internal gears.
Wiring the Safety Sensors: A Non-Negotiable Step
Modern garage doors are incredibly safe, but only if the sensors are aligned correctly. According to the U.S. Consumer Product Safety Commission (CPSC), properly functioning photoelectric eyes have reduced garage door-related entrapment incidents by over 95% since federal mandates were introduced.
As noted in Wikipedia’s comprehensive overview of garage door openers, these infrared beams act as an invisible tripwire. If anything breaks the beam while the door is closing, the motor instantly reverses.
Step-by-Step Sensor Installation
- Mount the Brackets: Attach the sensor brackets to the vertical door tracks on both sides of the door.
- Measure the Height: Position each sensor exactly 6 inches above the garage floor. This specific height prevents debris from blocking the beam while still detecting small children or pets.
- Route the Wires: Run the 22-gauge bell wire from the sensors up to the motorhead. Use insulated staples to secure the wire to the wall, keeping it at least 1 inch away from any high-voltage power lines.
- Align the Lenses: Point the sensors at each other. The sending sensor will have a solid amber light, while the receiving sensor will glow solid green when perfectly aligned. If the green light blinks, gently bend the bracket until the beam connects.
Programming Your Remotes and Wall Control
Once the hardware and safety beams are operational, it is time to establish communication between your remotes and the motor. Liftmaster utilizes Security+ 2.0 technology, which sends a new code every time the remote is used, preventing code grabbers from hacking your garage.
Syncing the Multi-Function Wall Control
The wall control is the brain of your interior setup.
- Strip exactly 7/16-inch of insulation from the bell wire ends.
- Insert the wires into the red and white terminals on the back of the wall control and tighten the screws.
- Connect the other ends to the corresponding red and white terminals on the motorhead.
- Press and hold the Learn button on the motorhead until the LED light turns off, then release. The wall control should now operate the door.
Pairing Your Remote Controls
Locate the Learn Button on the motorhead. It is usually color-coded (yellow, purple, orange, or red) depending on your model’s manufacturing year.
- Press and release the Learn button. The indicator LED will light up brightly.
- Within 30 seconds, press and hold the button on your remote control that you wish to program.
- Hold it until the motorhead lights flash or you hear two distinct clicks.
- Repeat this process for your vehicle’s built-in HomeLink system or additional keychain remotes.
Connecting to the myQ App for Smart Home Access
Transforming your standard opener into a smart device is one of the best upgrades you can make. The myQ app allows you to monitor, open, and close your garage door from anywhere in the world.
The Wi-Fi Setup Process
- Download the App: Install the myQ app on your iOS or Android device and create an account.
- Activate Wi-Fi Mode: Press the Learn button on your Liftmaster motorhead until the blue Wi-Fi LED starts blinking.
- Connect to the Network: Open the app and follow the prompts to connect the opener to your home’s 2.4GHz Wi-Fi network. (Note: Most smart garage openers cannot connect to 5GHz networks, so ensure your router’s 2.4GHz band is active).
- Finalize: Once connected, the blue LED will turn solid. You can now set up real-time push notifications, create schedules, and even integrate with Amazon Key for secure in-garage deliveries.
Liftmaster Drive Types: Which System Do You Have?
Understanding your specific drive type helps you maintain it properly. Here is a quick text-infographic comparison of the three main Liftmaster systems:
| Feature | Chain Drive | Belt Drive | Screw Drive |
|---|---|---|---|
| Mechanism | Metal chain (like a bicycle) | Steel-reinforced rubber belt | Threaded steel rod |
| Noise Level | High (Loud) | Ultra-Quiet | Moderate |
| Best For | Detached garages, heavy doors | Attached garages, bedrooms above | Extreme temperatures |
| Maintenance | Requires annual lubrication | Virtually maintenance-free | Requires occasional lubrication |
If you are setting up a Belt Drive system, never use traditional grease on the rail, as it will attract dust and degrade the rubber belt over time.
Frequently Asked Questions About Liftmaster Setup
Q1: Why is my Liftmaster garage door opener not connecting to Wi-Fi? The most common culprit is your router’s frequency. Liftmaster myQ openers require a 2.4GHz Wi-Fi signal. Many modern routers combine 2.4GHz and 5GHz networks under a single name. Log into your router settings and separate the bands, or move closer to the router during the initial pairing process to ensure a strong signal reaches the garage.
Q2: How do I reset my Liftmaster garage door opener? If your remotes stop working or you move into a new house, you should wipe the memory. Press and hold the Learn button on the motorhead for about 6 to 10 seconds. Release the button when the LED indicator light turns off. This erases all previously paired remotes and keypads, allowing you to start fresh and prevent previous owners from accessing your home.
Q3: Can I use my old Liftmaster remotes with a new opener? It depends on the frequency. If your old remote features a yellow Learn button (introduced around 2011), it will likely pair with newer Security+ 2.0 openers. However, if your old remote has a green or red learn button (operating on 390 MHz), it is incompatible with modern security protocols, and you will need to purchase new remotes or a universal radio receiver.
Q4: How often should I replace the backup battery? If your Liftmaster features Battery Backup (a crucial feature for storm-prone areas), the internal 12V lead-acid or lithium-ion battery should be replaced every 1 to 2 years. The motorhead will emit a loud, continuous beep when the battery drops below 20% capacity. Ignoring this beep will eventually result in the system failing to operate during a power outage.
Q5: What do the blinking LED lights on my Liftmaster mean? Liftmaster uses diagnostic codes via blinking lights.
- 1 Blink: Safety sensor wires are shorted or broken.
- 2 Blinks: Safety sensor wires are reversed (red to white, white to red).
- 4 Blinks: Safety sensors are misaligned or obstructed.
- 5 Blinks: The RPM sensor or motor has overheated. Allow the unit to cool for 15 minutes.
Conclusion
Learning how to set up my Liftmaster garage door opener might seem like a daunting DIY project, but by breaking it down into manageable steps—from hanging the powerhead to aligning the safety sensors—you can achieve professional-grade results right in your own driveway. Not only does a proper setup ensure the safety of your family, but integrating the myQ app brings your home firmly into the modern smart-home era, giving you ultimate peace of mind.
Did you find this installation guide helpful? Share this article on Facebook, Pinterest, or your favorite DIY Reddit community to help your friends and neighbors conquer their own garage door setups!



Leave a Reply