If you’re planning to install a new garage door, understanding the rough opening for a 9×7 garage door is essential. This guide will walk you through the process of measuring and preparing the opening for installation, ensuring a seamless and successful project.
What is a Rough Opening?
Before we delve into the specifics of a rough opening for a 9×7 garage door, let’s first define what a rough opening is. In construction terminology, a rough opening refers to the framed opening in a wall that is ready to receive a door or window. It includes the structural framing members surrounding the opening, such as studs, headers, and jambs.
Measuring the Rough Opening For a 9×7 Garage Door
To determine the rough opening dimensions for a 9×7 garage door, you’ll need to take precise measurements of the width and height of the opening. Start by measuring the width between the side jambs of the garage door opening. This measurement should be 9 feet. Next, measure the height from the floor to the top of the opening. This measurement should be 7 feet.
Adjustments for Installation: Rough Opening For a 9×7 Garage Door
Keep in mind that the rough opening dimensions may need to be adjusted slightly to accommodate the installation of the garage door tracks, hardware, and weatherstripping. Consult the manufacturer’s instructions for the specific requirements of your garage door model.
Framing the Rough Opening
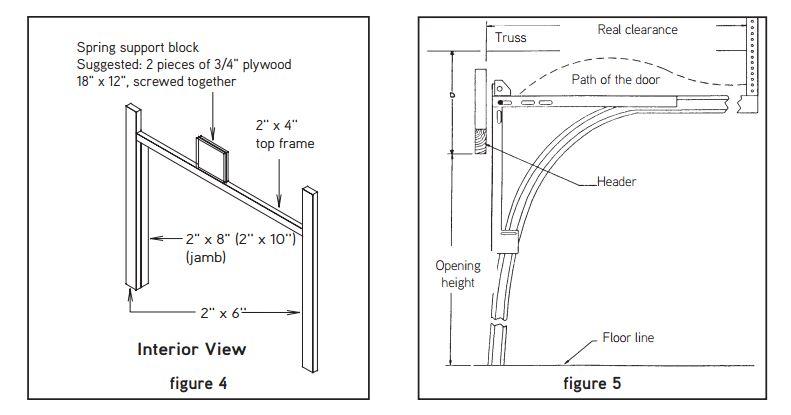
Once you have determined the correct dimensions for the rough opening, you can begin framing the opening to prepare it for installation. Use pressure-treated lumber or galvanized steel studs for the framing members to ensure durability and stability. Install the studs, headers, and jambs according to the manufacturer’s recommended spacing and fastening methods.
Read too: No Power to Genie Garage Door Opener – Resolving the Issue with Ease: Troubleshooting Guide
Additional Considerations
In addition to framing the rough opening, there are a few other factors to consider when preparing for the installation of a 9×7 garage doors. These include:
- Insulation: Consider adding insulation to the walls surrounding the garage door opening to improve energy efficiency and temperature control.
- Siding: If the exterior of your garage is finished with siding, you may need to remove and replace sections of siding to accommodate the new door.
- Clearance: Ensure that there is sufficient clearance around the garage door opening for smooth operation of the door and tracks.
Conclusion
By understanding the rough opening dimensions for a 9×7 garage doors and following the proper installation procedures, you can ensure a smooth and successful project. Whether you’re replacing an existing door or installing a new one, taking the time to measure and prepare the opening correctly will pay off in the long run.


Leave a Reply