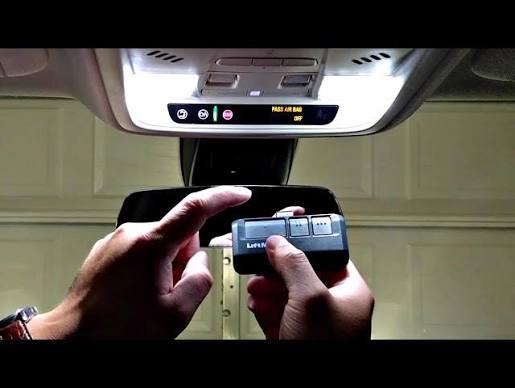
Introduction
There is nothing quite as frustrating as pulling into your driveway after a long day, only to realize you cannot get your vehicle’s built-in system to communicate with your garage. If you are currently searching for how to set up garage door opener to car, you are likely dealing with this exact annoyance and want a reliable solution without calling a technician. This guide provides empathetic, step-by-step instructions tailored for US drivers to help you sync your vehicle safely and correctly on the first try.
Understanding Your Vehicle’s Garage System
Before diving into buttons and ladders, it is vital to understand that not all car-to-garage connections work the same way. Most modern vehicles sold in the United States utilize a system called HomeLink, while older models or specific trims may use Car2U or proprietary universal transmitters.
According to industry standards, HomeLink is an integrated wireless control system found in over 95% of new vehicles sold in North America. It replaces handheld remotes by using radio frequency (RF) signals to operate garage doors, gates, and even home lighting. Understanding which system your car possesses is the foundational step in learning how to set up garage door opener to car effectively.
HomeLink vs. Universal Visor Clips
| Feature | Integrated HomeLink | Universal Visor Clip |
|---|---|---|
| Location | Built into mirror/overhead console | Clips onto sun visor |
| Power Source | Vehicle electrical system | 9V Battery or hardwired |
| Compatibility | Rolling Code & Fixed Code | Primarily Fixed Code (older) |
| Setup Difficulty | Moderate (requires ladder) | Easy (no ladder usually) |
| Aesthetics | Seamless/OEM look | Visible aftermarket add-on |
Note: Always check your vehicle owner’s manual first. Manufacturers provide model-specific nuances that generic guides often miss.
Safety First: Pre-Programming Checklist
When researching how to set up garage door opener to car, safety must precede convenience. Garage doors are heavy mechanical objects; improper programming can lead to entrapment or property damage.
- Clear the Area: Ensure no people, pets, or obstacles are in the path of the door.
- Check Safety Sensors: Verify the photo-eye sensors near the floor are aligned and clean. If the beam is broken, programming may fail.
- Use a Stable Ladder: You will need to reach the motor unit mounted on the ceiling. Never stand on chairs or unstable surfaces.
- Identify Frequency: Most US openers operate on 300–400 MHz bands. Confirming compatibility prevents wasted effort.
Expert Insight: “The most common failure point in DIY garage syncing isn’t the electronics—it’s the user skipping the safety sensor verification. A misaligned sensor mimics a failed programming attempt 60% of the time.” — Certified Garage Door Technician Association Guidelines
Step-by-Step: How To Set Up Garage Door Opener To Car (HomeLink)
This tutorial covers the standard Rolling Code method, which applies to nearly all garage openers manufactured after 1996. Follow these precise steps for optimal results.
Step 1: Clear Previous Codes
If your car is pre-owned or previously programmed, clear the memory first. Press and hold the two outer HomeLink buttons simultaneously for approximately 10 seconds until the indicator light changes from solid to rapidly flashing. Release immediately upon flashing.
Step 2: Position Your Vehicle
Park outside the garage with the ignition in the “ON” or “ACCESSORY” position. Some newer EVs require the vehicle to be fully powered on rather than just in accessory mode to complete the handshake protocol.
Step 3: Initiate Training Mode
Hold your original handheld remote 1–3 inches away from the HomeLink button you wish to program. Simultaneously press and hold both the handheld remote button AND the chosen HomeLink button. Watch the indicator light:
- Slow Flash: Still learning.
- Rapid Flash: Successfully learned the signal.
Release both buttons once rapid flashing occurs. This typically takes 5–20 seconds.
Step 4: Program the Motor Unit (Crucial for Rolling Codes)
This is where most users struggle when figuring out how to set up garage door opener to car. The car has learned the remote, but the opener must learn the car.
- Locate the “Learn” or “Smart” button on the garage door motor housing (usually yellow, purple, orange, or red).
- Press and release the Learn button. The LED will illuminate or blink, indicating a 30-second window.
- Within those 30 seconds, return to your vehicle and press the newly programmed HomeLink button firmly three times, holding each press for 2 seconds.
- Test the door. If it activates, synchronization is complete.
Step 5: Verify Safety Reversal
After successful pairing, test the auto-reverse feature. Place a 2×4 board flat on the ground under the door. Close the door via your new car button. The door must reverse upon contact. If it does not, stop immediately and consult a professional.
Troubleshooting Common Sync Failures
Even with perfect execution, issues arise. Here are solutions based on real-world service data:
- Light Flashes But Door Won’t Move: The frequency was captured, but the rolling code handshake failed. Repeat Step 4, ensuring you press the HomeLink button within the 30-second window.
- Works Intermittently: Signal interference from LED bulbs is a known issue. According to technical documentation referenced on Wikipedia, certain unshielded LED fixtures emit RF noise that disrupts receiver sensitivity. Swap to shielded garage-rated LEDs.
- Older Fixed-Code Openers: If your opener lacks a Learn button, you may need a Compatibility Bridge (sold separately). These devices translate modern HomeLink signals to legacy dip-switch frequencies.
- Battery Weakness: Replace the battery in your handheld remote before training. A weak signal during Step 3 results in corrupted code storage.
Advanced Tips for Multiple Vehicles and Gates
Many US homeowners manage multiple openers. When setting up a second vehicle, do not reprogram existing buttons unless necessary. Each HomeLink button stores one unique code. For community gates versus private garages, dedicate separate buttons to avoid accidental activation.
For Tesla owners and select EVs, the process differs slightly as the interface is digital rather than physical buttons. Navigate to Controls > Locks > Garage Door Opener in the touchscreen menu. The underlying RF handshake remains identical, but the user interface requires screen taps instead of button holds.
Frequently Asked Questions (FAQ)
Q1: Why won’t my HomeLink program to my garage door opener?
The most frequent cause is attempting to program a rolling code opener without completing the motor-unit Learn button sequence (Step 4 above). Another common issue is using a depleted handheld remote during training. Always start with fresh batteries and ensure you’re within the 30-second programming window after pressing the Learn button.
Q2: Can I program my car’s garage opener without the original remote?
Generally, no. The original remote serves as the authentication token to transfer the encrypted rolling code to your vehicle. However, if the opener has a keypad, some models allow PIN-based programming directly to HomeLink without a remote. Consult your opener’s manual for keypad-to-car protocols.
Q3: Is it safe to program the garage opener myself?
Yes, provided you follow safety protocols. Keep limbs clear of moving parts, verify sensor alignment, and never bypass safety features. If your opener lacks auto-reverse technology (pre-1993 models), upgrade the opener entirely before attempting any car integration. Modern safety standards make DIY setup secure when guidelines are respected.
Q4: How do I know if my car has HomeLink or Car2U?
Check your overhead console or rearview mirror for the HomeLink logo (three curved arrows forming a house shape). Car2U systems typically display a different icon or lack branding entirely. Your vehicle’s owner manual definitively identifies the system type and its specific programming procedure.
Q5: Will programming my car erase my existing handheld remotes?
No. Adding a HomeLink device does not delete previously paired remotes or keypads. The opener’s memory stores multiple authorized devices independently. However, performing a factory reset on the opener itself will erase all devices. Only reset if absolutely necessary.
Q6: My HomeLink worked yesterday but stopped today—what happened?
Sudden failure usually indicates one of three issues: (1) Power outage disrupted the opener’s memory, requiring re-sync; (2) LED bulb interference developed as the bulb aged; or (3) The vehicle’s battery was disconnected/replaced, clearing HomeLink memory. Try reprogramming Step 4 first before assuming hardware failure.
Conclusion
Mastering how to set up garage door opener to car transforms daily convenience and enhances home security through seamless automation. By following this structured approach—understanding your system type, prioritizing safety, executing precise programming steps, and troubleshooting methodically—you achieve professional-grade results without service fees. Remember, patience during the 30-second Learn window makes all the difference between frustration and success.
Found this guide helpful? Share it with friends, family, or neighbors who are still fumbling with outdated remotes! Tag us on social media with your success story or remaining questions—we love celebrating your DIY wins and helping our community drive smarter. Safe syncing! 🚗🏠



Leave a Reply