Craftsman garage door openers are known for their robust build and efficient performance. However, like any mechanical device, they are not immune to wear and tear. One of the most critical components in your Craftsman garage door opener is the logic board. This board acts as the “brain” of your opener, controlling the motor and receiving signals from your remote or wall console. If your garage door is malfunctioning or not responding, the logic board could be the culprit.
Replacing the logic board is a relatively straightforward process that can be done by homeowners with basic tools and a little patience. In this guide, we will walk you through how to replace the logic board on a Craftsman garage door opener. From troubleshooting to installation, we’ve got all the details you need to ensure a smooth and successful repair.
Read too: No Power to Genie Garage Door Opener – Resolving the Issue with Ease: Troubleshooting Guide
What Is a Logic Board and Why Does It Need Replacing?
The logic board in a Craftsman garage door opener is responsible for processing signals from your remote control and sensors, as well as controlling the motor’s operation. Essentially, it acts as the brain of the opener, ensuring everything runs smoothly. Without the logic board, your garage door would not function properly, and your opener would not respond to commands.
Over time, the logic board may experience issues such as:
- Electrical surges or power fluctuations
- Wear and tear due to age
- Physical damage from dust, moisture, or impact
When the logic board fails, you may experience issues such as the garage door not responding to the remote, the door opening or closing intermittently, or the motor making unusual noises. If you notice these problems, replacing the logic board is often the solution.
Signs You Need to Replace the Logic Board
Before proceeding with the replacement process, it’s important to ensure that the logic board is the root cause of the issue. Here are some common signs that indicate your Craftsman garage door opener’s logic board may need replacing:
- The garage door won’t respond to the remote control or wall switch.
- The garage door opens or closes intermittently.
- The opener is making strange or unusual noises.
- The LED lights on the opener are flashing or not lighting up at all.
- The door stops midway through opening or closing.
If you’re experiencing any of these issues, replacing the logic board could be the solution to restore the proper functioning of your garage door opener.
Tools You’ll Need for the Job
Replacing the logic board on your Craftsman garage door opener doesn’t require any specialized tools, but you will need a few basic items to complete the task:
- Screwdriver set (Phillips and flat-head)
- Replacement logic board (ensure compatibility with your Craftsman model)
- Wire cutters or strippers (to disconnect and reconnect wires)
- Multimeter (optional, for checking the functionality of the logic board before replacement)
- Work gloves (to protect your hands during the process)
With these tools in hand, you are ready to begin the replacement process.
How To Replace Logic Board On Craftsman Garage Door Opener
Step 1: Disconnect the Power Supply
Before starting any work on your Craftsman garage door opener, safety is the top priority. Begin by disconnecting the power supply to prevent any electrical hazards. You can either unplug the opener from the electrical outlet or turn off the circuit breaker that controls the garage door opener’s power.
Step 2: Remove the Cover of the Garage Door Opener
Once the power is off, the next step is to remove the cover of the garage door opener. Using a screwdriver, unscrew the fasteners holding the cover in place. Most Craftsman openers will have a plastic or metal cover that needs to be removed to access the internal components. After removing the screws, gently take off the cover to expose the logic board and other internal parts.
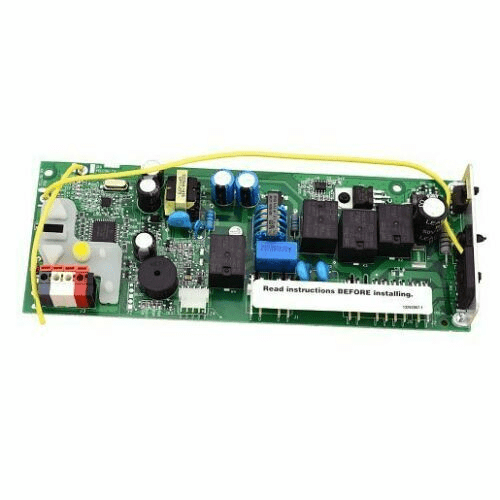
Step 3: Locate the Logic Board
The logic board is typically situated near the center of the garage door opener, usually at the back or front of the unit. It will be a rectangular-shaped circuit board with several small components like capacitors, resistors, and connectors. It is important to locate the logic board before proceeding with its removal.
Step 4: Disconnect the Wires
The logic board is connected to several components, such as the motor, sensors, and the remote control receiver, through a network of wires. Before removing the logic board, take note of how the wires are connected, or better yet, take a picture for reference. Use wire cutters or strippers to carefully disconnect the wires from the logic board.
Some garage door openers have additional connected parts, such as a light or a display panel, that will also need to be disconnected at this stage.
Step 5: Remove the Faulty Logic Board
Once all the wires are disconnected, it’s time to remove the faulty logic board. The board may be held in place with screws or clips. Use your screwdriver to remove any fasteners securing the board. Gently lift the board from its housing, being careful not to damage any other components. If the board is stuck, gently wiggle it free, but avoid applying excessive force to prevent damaging the unit.
Step 6: Install the New Logic Board
Now it’s time to install the replacement logic board. Align the new logic board in the same position as the old one, ensuring that all holes line up with the mounting points. Secure the new logic board with the screws or clips you removed from the old board. Once the board is in place, reconnect the wires according to the reference you made earlier. Ensure that each wire is securely connected to the correct terminal.
Step 7: Test the New Logic Board
Before reassembling the opener, it’s essential to test the new logic board to ensure that everything is functioning correctly. Plug the garage door opener back into the power source or turn on the circuit breaker. Test the opener by using the remote control or wall switch to open and close the door. Also, test any other functions, such as the sensors, lights, and remote control signal. If the garage door operates as expected, proceed to the next step.
Step 8: Reassemble the Garage Door Opener
Once you’ve verified that the new logic board is working properly, reattach the cover of the garage door opener. Secure the cover with the screws that you removed earlier. Make sure the cover is properly aligned and fastened to avoid any gaps or loose parts.
Step 9: Perform a Final Test
After reassembling the garage door opener, perform one final test to ensure that everything is in good working order. Open and close the garage door a few times to make sure the opener is operating smoothly. If everything is functioning correctly, your logic board replacement is complete.
Maintenance Tips for Your Craftsman Garage Door Opener
To prevent future issues with your Craftsman garage door opener, here are a few maintenance tips:
- Regular inspections: Periodically inspect your garage door opener for any signs of wear, particularly around the logic board and wiring.
- Clean the unit: Dust and dirt can affect the performance of the opener, so regularly clean the interior of the opener to keep it running efficiently.
- Lubricate moving parts: Apply lubricant to the door’s tracks, rollers, and hinges to reduce wear and keep the opener functioning smoothly.
- Check for obstructions: Ensure there are no objects blocking the door’s path, as this can cause operational issues.
Conclusion
Replacing the logic board on your Craftsman garage door opener may seem daunting, but with the right tools and a bit of patience, it’s a manageable task for most homeowners. By following the step-by-step guide outlined above, you can restore your garage door opener to its full functionality. Just remember to take your time, ensure that all connections are secure, and perform a final test before reassembling the unit. If you’re still having trouble after replacing the logic board, it may be time to consult a professional.


Leave a Reply