Losing access to your garage can be incredibly frustrating. Whether you have misplaced your old clicker or just purchased a replacement, figuring out the synchronization process can feel overwhelming without the right instructions. This comprehensive guide will show you exactly how to program a new garage door opener remote quickly and safely, ensuring you regain seamless access to your home.
Understanding Your Garage Door Opener System
Before diving into the buttons and codes, it is essential to understand that not all garage door openers work the same way. The method you use depends heavily on the age of your unit and the technology it employs. Most modern openers use one of two primary technologies: DIP switches or rolling code technology.
Older models, typically manufactured before the mid-1990s, often rely on DIP switches. These are tiny physical switches inside both the remote and the motor unit that must match exactly. However, due to security vulnerabilities, most units produced after 1993 utilize rolling code technology. This system changes the access code every time you press the button, making it nearly impossible for thieves to intercept and replicate your signal.
According to Wikipedia’s entry on garage door openers, the shift toward rolling codes was driven by rising concerns over “code grabbing” thefts. Knowing which system you have is the first critical step in successful programming.
Identifying Your Opener Brand and Model
The specific steps for programming vary significantly between manufacturers. While the general logic remains similar, the location of the “Learn” button and the color-coding can differ. Here is a quick reference for the most common brands in the US market:
| Brand | Common Learn Button Color | Typical Location |
|---|---|---|
| Chamberlain / LiftMaster | Yellow, Purple, Orange, or Red | Back panel, near antenna wire |
| Genie | Purple, Red, or Green | Side or back of motor unit |
| Craftsman | Yellow, Purple, or Orange | Similar to Chamberlain (same parent co.) |
| Stanley | Blue or Green | Front or side panel |
Note: If you cannot find a learn button, consult your owner’s manual. Some very old models require you to match DIP switches manually.
Step-by-Step Guide: Programming a Rolling Code Remote
For the vast majority of homeowners with units installed after 1993, this is the method you will use. Follow these steps precisely to ensure a successful sync.
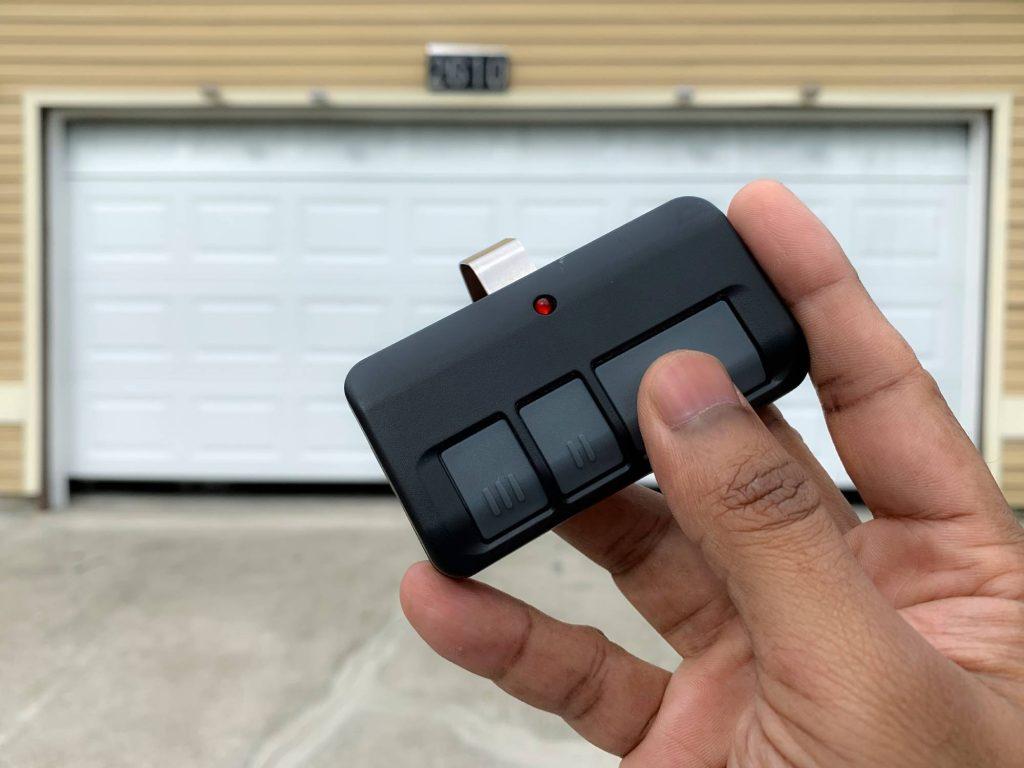
Step 1: Locate the Learn Button
Climb a sturdy ladder to access the motor unit hanging from your garage ceiling. Look for a small button labeled “Learn,” “Smart,” or “Program.” It is usually located on the back or side of the unit, near where the antenna wire hangs down. The button is often colored (yellow, purple, orange, or red).
Step 2: Clear Old Codes (Optional but Recommended)
If you are replacing a lost remote, it is wise to clear all previously programmed remotes to prevent unauthorized access. Press and hold the Learn button for about 6–10 seconds until the indicator light next to it turns off. Warning: This will erase all existing remotes and keypad codes, so you will need to reprogram every device you own.
Step 3: Initiate Programming Mode
Press the Learn button once briefly. You will see an indicator light turn on or start blinking. This signals that the opener is now in “listening mode” and waiting for a signal from a remote. You typically have 30 seconds to complete the next step.
Step 4: Sync the New Remote
While standing within range of the motor unit (usually 5–10 feet away), press and hold the button on your new remote that you wish to use. Hold it for 2–3 seconds. You may need to press it multiple times if the first attempt doesn’t register.
Step 5: Confirm Success
Watch the motor unit’s indicator light. If it blinks or turns off, the programming was successful. Test the remote by pressing the button again. The garage door should activate immediately. If the light does not change, repeat Steps 3 and 4, ensuring you are within range and using fresh batteries.
Troubleshooting Common Programming Issues
Even with careful following of instructions, things can go wrong. Here are the most common hurdles and how to overcome them.
The Remote Won’t Sync
If the remote fails to program, the issue is often power-related. Replace the batteries in the remote with brand-new alkaline ones. Weak batteries may emit a signal strong enough to open the door from close range but too weak to be recognized during the programming handshake.
Interference from LED Bulbs
A surprisingly common issue involves LED light bulbs in the garage door opener unit. Some LED bulbs emit radio frequency interference that blocks the remote’s signal. If you recently changed bulbs, try switching back to incandescent bulbs temporarily to see if programming succeeds.
Distance and Obstacles
Ensure you are standing close to the motor unit during programming. Metal roofs, thick insulation, or large vehicles parked directly under the opener can block signals. Move closer to the unit and try again.
Programming DIP Switch Remotes (Older Models)
If your opener lacks a Learn button, you likely have an older DIP switch model. This process is mechanical rather than digital.
- Open the Remote: Use a small screwdriver to open the casing of your new remote.
- Locate the Switches: You will see a row of tiny switches (usually 8–12).
- Match the Pattern: Open the motor unit cover and locate the corresponding DIP switches. Set the switches in the remote to the exact same position (Up/Down) as those in the motor unit.
- Test: Close both covers and test the remote. No button-pressing sequence is required; the physical alignment of the switches creates the code.
Security Note: DIP switch systems are highly vulnerable to hacking. If possible, consider upgrading your motor unit to a modern rolling-code system for better home security.
Frequently Asked Questions (FAQ)
Can I program a universal remote to any garage door opener?
Most universal remotes are compatible with major brands like Chamberlain, LiftMaster, Genie, and Craftsman. However, they may not work with proprietary systems or very old European models. Always check the compatibility list on the remote’s packaging before purchasing.
How many remotes can I program to one opener?
Most modern garage door openers allow you to program between 5 to 8 remotes simultaneously. Some high-end smart openers support even more devices, including smartphones and keypads. Check your specific model’s manual for the exact limit.
What should I do if I lost all my remotes?
If you have no working remotes, you can still program a new one using the Learn button on the motor unit. However, if you also forgot your keypad PIN, you may need to reset the entire system. In extreme cases, contacting a professional technician is safer than attempting to bypass security features.
Is it safe to program a remote while the door is moving?
No. Always ensure the garage door is fully closed before starting the programming process. This prevents accidental activation that could lead to injury or damage to vehicles and property.
Why does my new remote work intermittently?
Intermittent performance usually indicates battery issues, signal interference, or a misaligned antenna on the motor unit. Try adjusting the direction of the antenna wire (it should hang vertically) and replacing the batteries. If the problem persists, the remote’s internal circuitry may be faulty.
Conclusion
Learning how to program a new garage door opener remote is a straightforward task that saves you time and money. By identifying your opener type, locating the Learn button, and following the precise syncing steps, you can restore access to your garage in minutes. Remember to keep your system secure by clearing old codes when necessary and upgrading outdated DIP switch models.
Did this guide help you get your garage working again? Share this article with friends and family who might be struggling with their own garage door remotes!


Leave a Reply