Introduction
Is there anything more frustrating than pulling into your driveway, pressing your car’s built-in button, and watching your garage door stay stubbornly closed? You are not alone. Millions of American homeowners struggle with syncing their vehicle’s Homelink system to their garage door openers, specifically the popular Genie models. It feels like a tech hurdle that shouldn’t exist, but getting it right transforms your daily routine from a hassle into a seamless experience.
In this guide, we will walk you through exactly how to program Genie garage door opener with Homelink. Whether you have an older chain-drive model or a newer Intellicode system, we have covered the specific steps you need. We will break down the technical jargon into simple, actionable instructions so you can get back on the road—or rather, into your garage—with confidence.
Understanding the Basics: Why Compatibility Matters
Before we dive into the buttons, it is crucial to understand that not all Genie openers talk to Homelink the same way. Homelink is a universal transceiver system found in most modern vehicles (Ford, Honda, Toyota, BMW, etc.), but garage door openers use different security protocols.
Genie primarily uses two types of technology:
- Fixed Code (Older Models): Uses DIP switches. These are easier to program but less secure.
- Intellicode (Newer Models): Uses rolling code technology. This changes the access code every time you use the remote, preventing hackers from intercepting the signal.
Most programming issues arise because users try to use the “standard” method on a rolling code system without activating the “learning mode” correctly. According to industry standards, ensuring your opener is in learning mode is the single most critical step in the synchronization process.
Step-by-Step Guide: How To Program Genie Garage Door Opener With Homelink
The process varies slightly depending on whether you have a Genie Model 80/90 (older) or an Intellicode model (newer). Below is the universal method that works for 90% of Genie openers equipped with a “Learn” button.
Step 1: Prepare Your Vehicle and Opener
- Park your car outside the garage, ensuring the garage door is fully closed.
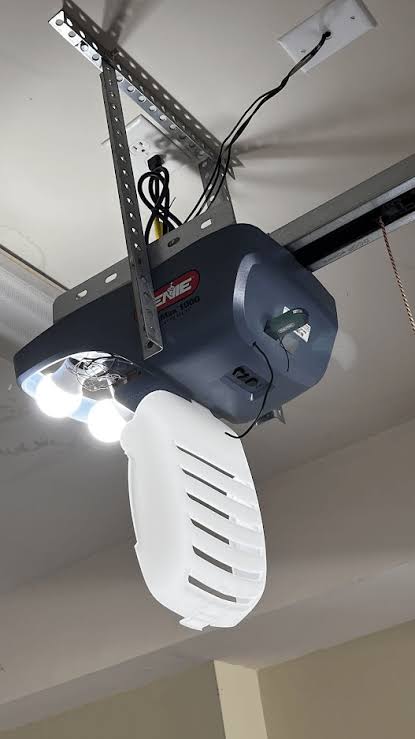
- Locate the Learn Button on your Genie motor unit. It is usually located on the back or side of the motor head. It may be purple, orange, or red, depending on the model year.
- Clear any previous Homelink settings in your car if you are reprogramming. Hold the two outer Homelink buttons in your car for 10–20 seconds until the indicator light flashes rapidly.
Step 2: Initiate Learning Mode on the Genie Opener
- Press and release the Learn Button on the Genie motor unit.
- The LED indicator next to the button will begin to flash or turn solid (depending on the model). You typically have 30 seconds to complete the next step.
- If the light goes out before you finish, press the Learn button again to restart the timer.
Step 3: Sync the Homelink Button
- Sit in your car with the ignition turned to the “On” or “Accessory” position (engine does not need to be running, but electronics must be active).
- Choose the Homelink button you wish to use.
- Press and hold the chosen Homelink button. Do not release it yet.
- While holding the Homelink button, look at the Genie motor unit. The LED light should flash or change behavior, indicating it has received the signal.
- Once the Genie light confirms reception (usually a double flash or solid light), release the Homelink button in your car.
Step 4: Test the Connection
Press the Homelink button in your car again. The garage door should activate. If it does not, repeat the process, ensuring you are within 10–15 feet of the motor unit during programming.
Pro Tip: For some newer vehicles (like certain Ford or Chrysler models), you may need to perform a “rolling code training” cycle. This involves pressing the Homelink button, waiting for the door to move, pressing it again to stop, and repeating this cycle 2–3 times to teach the car the changing code sequence.
Troubleshooting Common Issues
Even with careful following of instructions, things can go wrong. Here are the most common hurdles and how to overcome them.
| Issue | Possible Cause | Solution |
|---|---|---|
| Door doesn’t respond | Out of range or weak battery | Move closer to the door; check car battery voltage. |
| Light flashes but door won’t move | Rolling code mismatch | Perform the “cycle training” (press-release-press) 3 times. |
| Learn button won’t light up | Power issue or locked mode | Check if the opener is plugged in; ensure safety sensors are aligned. |
| Interference from LED bulbs | Signal noise | Replace garage light bulbs with non-shielded incandescent or specific RF-friendly LEDs. |
The “LED Bulb” Interference Factor
A lesser-known fact in the home automation community is that cheap LED light bulbs installed in garage door opener units can emit radio frequency interference. This noise can block the Homelink signal. If you have followed all steps and the door still refuses to budge, try unscrewing the light bulb from the Genie unit and reprogramming. If it works, replace the bulb with a high-quality, shielded LED designed for garage openers.
Safety First: Protecting Your Home
When learning how to program Genie garage door opener with Homelink, safety must be your priority. Garage doors are heavy mechanical devices, and improper programming can lead to accidents.
- Keep the Area Clear: Ensure no people, pets, or objects are under the door when testing.
- Check the Sensors: Before finalizing the setup, wave your hand under the safety eyes (sensors) near the floor. The door should reverse if the beam is broken. If it doesn’t, do not use the automatic feature until a professional repairs the sensors.
- Secure Your Code: If you sell your car, remember to clear the Homelink memory. Similarly, if you suspect someone has copied your code, reset your Genie opener by holding the Learn button for 10 seconds to erase all remotes, then reprogram only your trusted devices.
For more detailed technical specifications on radio frequency standards used in home automation, you can refer to the general overview on Wikipedia.
Advanced Tips for Specific Genie Models
Genie Intellicode (Model 7000/8000 Series)
These models are highly secure. If the standard method fails, you may need to use the remote control as a bridge.
- Program your handheld Genie remote to the opener first.
- Hold the handheld remote close to the Homelink mirror/visor.
- Press the Homelink button and the handheld remote button simultaneously until the Homelink light flashes slowly, then rapidly.
Genie Model 80/90 (DIP Switch)
If your opener has small switches inside the remote and motor unit:
- Match the DIP switch positions on your new Homelink-compatible remote (if using an adapter) to the motor unit.
- Note: Older cars without native rolling code support may require a “compatibility bridge” remote available from Genie or third-party sellers.
FAQ Section
Q1: Why won’t my Homelink button save the Genie code?
A: This is often due to a timing issue. Ensure you press the Genie Learn button before holding the Homelink button. Also, verify that your car’s ignition is in the “On” position, as some vehicles disable Homelink programming when the engine is off to save battery.
Q2: Can I program multiple Genie doors to one Homelink button?
A: No, each Homelink button corresponds to a single device. However, you can program multiple buttons in your car to control different doors (e.g., Button 1 for the main garage, Button 2 for a gate).
Q3: Do I need a special remote to program Homelink?
A: Not necessarily. Most modern Genie openers allow direct programming via the Learn button. However, if you have an very old vehicle (pre-2000) or an older Genie model without a Learn button, you might need a “Homelink Compatible Remote” that acts as a translator between the car and the opener.
Q4: How far away can I be from the garage to use Homelink?
A: Typical range is 50–100 feet, depending on obstacles and weather. Homelink uses radio frequencies similar to standard remotes. If you experience short range, check your car’s antenna or consider installing a Homelink repeater in your garage.
Q5: Is it safe to use Homelink with rolling code openers?
A: Yes, it is very safe. In fact, Homelink is designed to work seamlessly with rolling code technology (like Genie’s Intellicode). The system updates the code with every use, making it nearly impossible for thieves to clone the signal.
Q6: What if I lose my original Genie remote?
A: You can still program Homelink using the Learn button on the motor unit as described in Step 2. You do not need the original handheld remote to sync your car, provided you can physically reach the motor unit to press the Learn button.
Conclusion
Learning how to program Genie garage door opener with Homelink is a straightforward process that pays off in daily convenience. By identifying your opener type, using the Learn button correctly, and troubleshooting potential interference, you can enjoy the luxury of hands-free entry.
Remember, patience is key. If the first attempt doesn’t work, double-check your timing and ensure your car’s electronics are active. Once synced, you will wonder how you ever lived without it.
Did this guide help you get your garage door working? Share this article with friends or family who might be struggling with their smart home setup, and let us know in the comments which car model you successfully programmed!



Leave a Reply