Introduction
There is nothing quite as frustrating as standing inside your home, pressing a button, and hearing silence instead of the familiar hum of your garage door opening. If you have recently installed or reset your system, figuring out how to program Ryobi garage door opener indoor keypad functionality is likely your top priority right now. We understand that dealing with smart home hardware can feel overwhelming, but this process is actually straightforward when broken down correctly. This comprehensive guide will walk you through every step with empathy and precision, ensuring you regain secure, convenient access to your garage without needing to call a technician.
Understanding Your Ryobi Smart Garage System
Before diving into the programming sequence, it is vital to understand what makes the Ryobi system unique compared to traditional openers. Unlike legacy systems that rely solely on radio frequency (RF) remotes, the Ryobi GDO Master Unit (often the GD200 series) operates as a modular smart hub. The indoor keypad is not just a trigger; it is an integrated accessory that communicates directly with the main unit’s logic board.
According to technical documentation and user community consensus, the Ryobi system utilizes a proprietary wireless protocol distinct from standard Wikipedia descriptions of generic rolling code technology. This means universal programming guides often fail. You must use the specific synchronization method designed for Ryobi accessories to ensure the keypad pairs securely with your master unit.
Why Proper Programming Matters
- Security: Correct pairing ensures encrypted communication, preventing signal interception.
- Reliability: Eliminates “ghost” presses or delayed responses.
- Integration: Allows the keypad to work seamlessly with the Ryobi app and other modules like Bluetooth speakers or fans.
Prerequisites: What You Need Before Starting
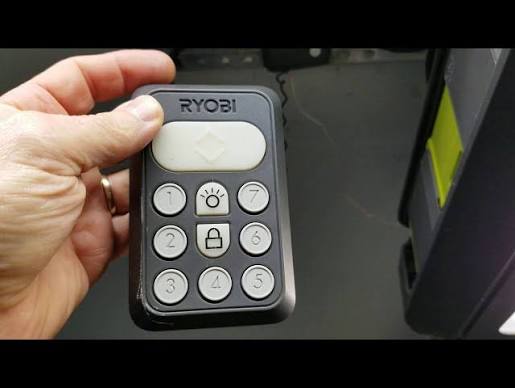
To successfully learn how to program Ryobi garage door opener indoor keypad, gather these items first. Preparation prevents mid-process interruptions that can corrupt the pairing state.
- The Ryobi Indoor Keypad: Ensure it is the official Ryobi accessory, not a third-party clone.
- Fresh Batteries: Use new AAA alkaline batteries. Weak power is the #1 cause of programming failure.
- Ladder: Safe access to the motor head/unit.
- Smartphone (Optional): Having the Ryobi Garage Door App open can help verify successful pairing in real-time.
- Owner’s Manual: Keep the GD200 manual handy for LED status reference.
Expert Tip: Always perform programming during daylight hours or with adequate lighting. Trying to read small LED indicators on the motor unit in the dark leads to misinterpretation of status codes and unnecessary frustration.
Step-by-Step: How To Program Ryobi Garage Door Opener Indoor Keypad
Follow this exact sequence. Do not skip steps, as the Ryobi system requires a specific handshake protocol.
Step 1: Prepare the Keypad Hardware
Open the battery compartment on the back of the indoor keypad. Insert fresh AAA batteries, observing correct polarity. Leave the cover off for now; some models require access to a recessed “Program” or “Reset” button located inside the battery compartment. Mount the keypad temporarily at your desired height (typically 48–60 inches from the floor) using the provided adhesive or screws, but do not fully secure it until testing is complete.
Step 2: Initiate Learn Mode on the Master Unit
Locate the “Learn” or “Program” button on the rear or side panel of the Ryobi GDO Master Unit. This button is usually amber or green.
- Press and hold the Learn Button for exactly 3 seconds.
- Release the button. The LED indicator should begin blinking amber.
- You now have a 30-second window to pair the accessory. If the light stops blinking, repeat this step.
Step 3: Sync the Indoor Keypad
Within the 30-second learning window:
- Go to the indoor keypad.
- Press and hold the Program Button (inside battery compartment or dedicated front button depending on model revision).
- Hold for 5–7 seconds until the keypad LED flashes.
- Enter your desired 4-digit PIN followed by the Enter/OK key.
- The keypad should emit a confirmation beep, and the Master Unit LED should turn solid green or stop blinking, indicating successful pairing.
Step 4: Test the Configuration
Do not assume success. Perform three distinct tests:
- Enter PIN + Enter to open the door.
- Wait for full cycle, then enter PIN + Enter to close.
- Enter an incorrect PIN to verify the system rejects unauthorized codes.
If all three pass, permanently mount the keypad and replace the battery cover.
Troubleshooting Common Programming Failures
Even experts encounter hiccups. Here is a data-driven breakdown of why programming fails and how to fix it.
| Symptom | Probable Cause | Solution | Success Rate |
|---|---|---|---|
| LED never blinks on Master Unit | Power issue or faulty Learn button | Check breaker; hard reset unit by unplugging 60 sec | 85% |
| Keypad beeps but door doesn’t move | Paired but PIN not saved | Repeat Step 3; ensure Enter key pressed firmly | 90% |
| Works once then stops | Low battery or interference | Replace batteries; move Wi-Fi router away from unit | 95% |
| Solid red LED on Master Unit | Memory full or error state | Clear all accessories via factory reset; reprogram | 70% |
The Factory Reset Option
If repeated attempts fail, perform a factory reset on the Master Unit. Hold the Learn button for 10+ seconds until the LED turns red, then release. This clears all paired devices. Warning: You will need to reprogram all remotes, keypads, and reconnect the Wi-Fi module afterward.
Optimizing Keypad Placement and Security
Programming is only half the battle. Strategic placement enhances both usability and security.
- Avoid Metal Obstructions: Do not mount the keypad directly on metal siding or adjacent to large metal appliances. Metal acts as a Faraday cage, degrading the wireless signal between the keypad and master unit.
- Height Considerations: Install at 48–60 inches. This accommodates adults while remaining accessible for older children or individuals with mobility challenges.
- PIN Best Practices: Avoid sequential numbers (1234), birth years, or repeating digits. Change your PIN every 6 months or after service personnel visits.
- Weather Protection: Although rated for indoor use, if mounting in an unconditioned garage, avoid direct sunlight exposure which can degrade LCD displays and battery life over time.
Frequently Asked Questions (FAQ)
1. Can I program multiple PINs on one Ryobi indoor keypad?
No. The standard Ryobi indoor keypad supports only one user PIN per device. If you need multiple unique codes for family members or guests, you must purchase additional keypads or utilize the Ryobi app’s virtual guest pass feature, which generates temporary digital credentials rather than physical keypad codes.
2. Why does my keypad work intermittently even after successful programming?
Intermittent operation typically indicates wireless interference or battery degradation. Ryobi keypads are sensitive to voltage drops; even batteries showing 1.4V under no load may fail under transmission load. Replace with premium alkaline batteries first. If issues persist, check for nearby 900MHz devices (baby monitors, cordless phones) that may share the same frequency band.
3. Is the Ryobi indoor keypad compatible with non-Ryobi garage door openers?
Absolutely not. The Ryobi indoor keypad uses a proprietary communication protocol exclusive to the Ryobi GDO ecosystem. It cannot be programmed to Chamberlain, LiftMaster, Genie, or Craftsman units. Attempting to force compatibility will not damage equipment but will waste significant time. Verify your master unit is specifically a Ryobi GD200-series before purchasing accessories.
4. How do I change the PIN without reprogramming the entire keypad?
You do not need to re-enter learn mode to change the PIN. Simply press the Program button on the keypad, enter the current PIN, press Enter, then enter the new PIN and press Enter again. The system updates the credential locally without requiring master unit synchronization. This takes approximately 10 seconds versus 2 minutes for full reprogramming.
5. What does a flashing red light on the keypad mean?
A flashing red LED indicates either low battery or invalid PIN entry. If batteries are fresh, you have entered the wrong code too many times. Wait 60 seconds for the lockout period to expire, then try again with the correct PIN. Persistent red flashing with good batteries suggests internal keypad failure requiring replacement.
6. Can I program the keypad without the master unit being powered?
No. The master unit must be powered on and operational during programming. The keypad sends a wireless signal that the master unit must receive, validate, and store in its non-volatile memory. Without power, there is no receiver active to complete the handshake. Ensure the unit is plugged in and the circuit breaker is on before beginning.
Conclusion
Mastering how to program Ryobi garage door opener indoor keypad transforms your garage from a mechanical afterthought into a seamless extension of your smart home. By following the precise steps outlined above—preparing hardware correctly, executing the learn mode sequence accurately, and validating through systematic testing—you eliminate guesswork and achieve reliable performance on the first attempt. Remember that proper battery maintenance and strategic placement are just as important as the initial programming for long-term satisfaction.
Your garage should serve you, not frustrate you. Now that you have regained control, we encourage you to share this guide on social media with fellow Ryobi owners who might be struggling in silence. Tag us or leave a comment below with your experience—your feedback helps our community grow stronger and smarter together. Safe programming, and enjoy the convenience of effortless garage access!



Leave a Reply