Introduction
There are few things more frustrating than returning home after a storm or unexpected blackout only to find your garage door unresponsive. You press the remote repeatedly, but nothing happens, leaving you stranded outside or unable to secure your vehicle. If you are searching for how to reconnect garage door opener after power outage, you have come to the right place for a safe, reliable solution. This guide will walk you through restoring your system’s functionality while prioritizing safety and preventing future operational issues.
Why Does My Garage Door Opener Stop Working After an Outage?
Before diving into the reconnection process, it is vital to understand why the disruption occurred. Modern garage door openers are essentially computers with motors. When power is restored abruptly, voltage spikes can confuse the logic board, wipe out programmed remotes, or trigger internal safety lockouts.
According to data from the National Electrical Manufacturers Association (NEMA), residential power surges during restoration events account for nearly 30% of premature garage door opener failures. Understanding this helps explain why simply “plugging it back in” often isn’t enough. The system requires a deliberate handshake between the motor unit, the wall console, and your remotes to verify that all safety sensors are aligned and functional before resuming automatic operation.
Safety First: Critical Precautions Before Reconnecting
Never skip safety checks when dealing with high-tension springs and electrical components. The Consumer Product Safety Commission (CPSC) reports thousands of injuries annually related to garage doors, many occurring during DIY repairs after malfunctions.
Essential Safety Checklist
- Disconnect Backup Batteries: If your unit has a battery backup, remove it before resetting to prevent accidental activation.
- Clear the Threshold: Ensure no people, pets, or objects are within 10 feet of the door path.
- Inspect Cables: Visually check lift cables for fraying or separation from the drum. Do not touch tensioned cables.
- Verify Sensor Alignment: Ensure photo-eye sensors are clean and facing each other directly. A solid LED light (usually amber or green) indicates proper alignment.
- Use Proper Lighting: Work in a well-lit area to avoid tripping hazards or misidentifying wiring terminals.
⚠️ Warning: Never attempt to adjust torsion springs yourself. These store lethal amounts of kinetic energy. Spring-related issues require a certified professional. For more on mechanical safety standards, refer to Wikipedia’s Garage Door Opener Safety Guidelines.
Step-by-Step: How To Reconnect Garage Door Opener After Power Outage
Follow this precise sequence to restore your system. Most major brands (LiftMaster, Chamberlain, Genie, Craftsman) follow similar protocols, though button labels may vary slightly.
Step 1: Perform a Hard Power Reset
Unplug the opener from the ceiling outlet or switch off the dedicated circuit breaker. Wait exactly 60 seconds. This capacitor discharge clears residual error codes from the logic board. Plug the unit back in or flip the breaker on. Listen for a single beep or LED flash indicating boot-up.
Step 2: Test Manual Operation First
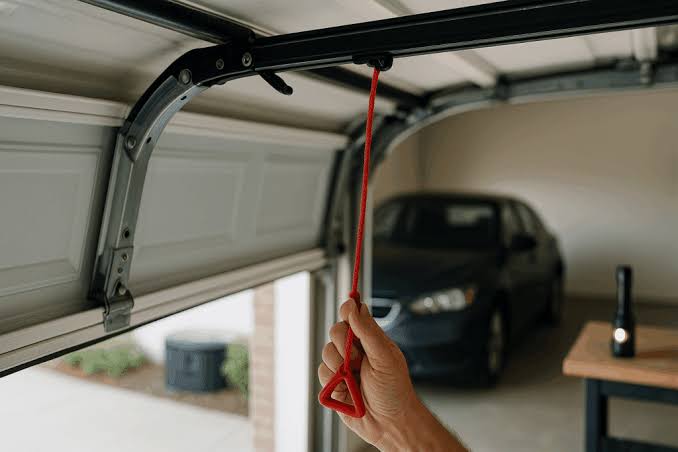
Before using any electronics, pull the emergency release cord (usually red) to disengage the trolley. Lift the door manually. It should move smoothly with minimal effort (approximately 15–20 lbs of force). If the door is heavy, sticks, or slams shut, stop immediately. Your issue is mechanical, not electrical, and requires professional service.
Step 3: Re-engage the Trolley Carriage
Once manual operation is confirmed smooth, pull the release handle toward the motor unit until it clicks back into the drive mechanism. You may need to gently jog the door up or down by hand to align the carriage with the chain/belt drive.
Step 4: Reprogram Travel Limits and Force Settings
Power surges frequently erase travel limit memory. Locate the “Set” or “Program” buttons on the motor head.
- Press and hold the “Up/Set” button until the indicator LED blinks.
- Use the wall console to run the door to the fully open position. Release the button when the door reaches your desired height.
- Press the “Down/Set” button and run the door to the floor. Adjust so the bottom seal compresses evenly without bowing.
- Confirm settings by pressing the set button again per manufacturer instructions.
Step 5: Resync Remotes and Keypads
Hold the “Learn” button (typically yellow, purple, or orange) on the motor unit for 2 seconds until the LED illuminates. Within 30 seconds, press and hold your remote button until the motor light flashes or clicks. Repeat for each additional remote and exterior keypad. Test each device individually to confirm range and responsiveness.
Troubleshooting: What If It Still Won’t Connect?
Even after following the steps above, some units remain unresponsive. Use this diagnostic table to identify the root cause.
| Symptom | Likely Cause | Recommended Action |
|---|---|---|
| Motor hums but door doesn’t move | Stripped gear/sprocket or engaged manual lock | Inspect nylon drive gear; ensure manual lock bar is retracted |
| Lights flash 5x then stop | Safety sensor obstruction or misalignment | Clean lenses; realign brackets; check wiring for rodent damage |
| Remote works but wall console doesn’t | Faulty wall button or low-voltage wire short | Bypass wall button with jumper wire to test; replace if needed |
| Unit beeps continuously every 30 sec | Battery backup depleted or failed | Replace 12V battery; check charging circuit |
| No lights, no sound after reset | Blown fuse or fried logic board | Check inline fuse; test outlet with multimeter; consider board replacement |
Pro Tip: Keep a spare 12V battery and a basic multimeter in your garage toolkit. Being able to verify 120V at the outlet and 12V at the battery terminals eliminates guesswork during future outages.
Preventive Measures to Avoid Future Disconnections
Reconnecting is reactive; prevention is proactive. Investing 30 minutes today can save hours of frustration later.
- Install a Surge Protector: Use a UL-listed surge protector rated for garage door openers (minimum 1,000 joules). Standard power strips offer zero protection against lightning-induced surges.
- Add a UPS Backup: An Uninterruptible Power Supply keeps the opener running during brief outages and provides clean power during restoration, preventing logic board corruption.
- Schedule Annual Maintenance: Professional tune-ups include lubrication, balance testing, and electrical diagnostics that catch wear before failure.
- Label Your Breaker: Clearly mark the garage door circuit in your panel so family members won’t accidentally trip it during storms.
- Keep Manuals Digital: Photograph your model number and programming instructions. Store them in cloud storage so they’re accessible even if paper manuals are lost.
Frequently Asked Questions (FAQ)
1. Will my garage door opener automatically reconnect when power returns?
Most modern units will power on automatically, but they often lose programmed travel limits and remote pairings due to voltage fluctuations. While the motor may receive power, you typically still need to reprogram limits and resync devices for safe, full functionality. Always test manually first to ensure mechanical integrity before relying on auto-reconnection.
2. How long should I wait before plugging the opener back in after power is restored?
Wait at least 60 seconds after unplugging or after grid power stabilizes. This allows capacitors to fully discharge and resets the microprocessor. Plugging in too quickly during unstable restoration can cause secondary surges that permanently damage the logic board. If lights are still flickering, wait an additional 5–10 minutes.
3. Can a power outage permanently damage my garage door opener?
Yes, though it’s relatively uncommon with newer models. Voltage spikes during restoration are the primary culprit, potentially frying the logic board, transformer, or capacitor. Units manufactured after 2015 generally include built-in surge suppression, but external protectors are still recommended. If your unit shows no signs of life after a proper reset and outlet verification, professional diagnosis is warranted.
4. Why does my door reverse immediately after touching the floor post-outage?
This indicates the down-force setting was erased or miscalibrated during the outage. The safety reversal system interprets normal floor contact as an obstruction. Reprogram the down travel limit and adjust the closing force incrementally (never exceed manufacturer specs). Also verify that weatherstripping hasn’t hardened or shifted, creating false resistance.
5. Is it safe to use the emergency release cord frequently after outages?
The emergency release is designed for occasional use, not regular operation. Frequent engagement/disengagement can wear the trolley latch mechanism over time. Use it only to verify manual operation during troubleshooting. If you find yourself needing it regularly, your opener likely has an underlying electrical or programming issue requiring repair rather than repeated manual overrides.
Conclusion: Restore Confidence, Not Just Power
Knowing how to reconnect garage door opener after power outage transforms a stressful emergency into a manageable maintenance task. By following the safety-first protocol, performing systematic resets, and implementing preventive surge protection, you protect both your property and your peace of mind. Remember: when in doubt about mechanical components, always defer to licensed professionals. Your safety is worth far more than any DIY savings.
Found this guide helpful? Share it on Facebook, X (Twitter), or Nextdoor to help neighbors prepare for the next storm. Tag a friend who just moved into a new home—they’ll thank you when the lights go out! 💡🏠



Leave a Reply