Introduction
There is a distinct sinking feeling when you pull the red emergency release cord on your garage door opener, only to realize you have no idea how to put it back. Whether you pulled it during a power outage, a mechanical jam, or simply by accident, your automatic system is now effectively disconnected from the door itself. Understanding how to reset garage door opener after pulling cord is an essential homeowner skill that saves you from expensive service calls and ensures your home remains secure.
This guide is designed to walk you through the re-engagement process safely and correctly. We will move beyond generic advice to provide specific, actionable steps tailored for US homeowners, ensuring your system operates smoothly without risking damage to the motor or injury to yourself.
What Happens When You Pull the Emergency Release Cord?
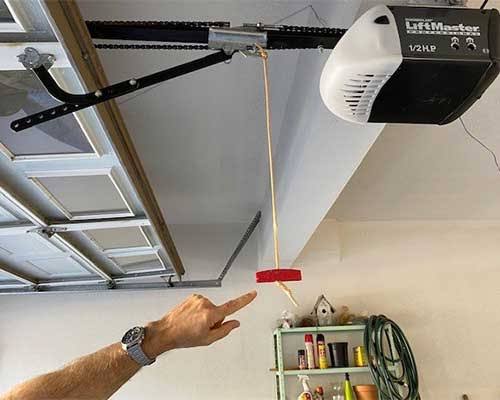
Before diving into the reset procedure, it is vital to understand the mechanics at play. The emergency release cord (often red with a black handle) is connected to the trolley carriage that rides along the opener rail. When pulled, it physically separates the trolley from the chain or belt drive.
According to engineering principles documented on Wikipedia, this mechanism is a mandatory safety feature designed to allow manual operation during power failures or entrapment emergencies. However, once separated, the motor can run freely without moving the door. Many users mistakenly believe pressing the wall button will “snap” it back into place; unfortunately, this usually just runs the motor uselessly and can strip internal gears if forced.
Key Symptoms of a Disconnected Opener
- Motor runs, door stays still: The most common sign.
- Slack in the chain/belt: Visual confirmation of disengagement.
- Manual operation only: The door moves up and down by hand with little resistance from the motor unit.
- Clicking sound: The latch mechanism may be partially engaged but not locked.
Safety First: Critical Precautions Before Resetting
Resetting a garage door involves working near high-tension springs and heavy moving parts. Neglecting safety here is the leading cause of DIY injuries in garage maintenance.
| Safety Check | Why It Matters | Action Required |
|---|---|---|
| Disconnect Power | Prevents accidental activation while hands are near the trolley. | Unplug the unit or flip the breaker. |
| Door Position | Re-engaging under tension is dangerous and difficult. | Ensure door is fully closed before resetting. |
| Spring Awareness | Torsion springs store lethal energy. | Never touch springs; focus only on the trolley latch. |
| Clear Area | Prevents tripping or crushing hazards. | Remove vehicles, tools, and pets from the zone. |
⚠️ Expert Warning: If your garage door feels excessively heavy to lift manually before you pulled the cord, do not attempt a reset. This indicates a broken spring or cable. Call a certified technician immediately.
Step-by-Step: How To Reset Garage Door Opener After Pulling Cord
Follow these precise instructions to re-engage your system. This process applies to most major US brands including LiftMaster, Chamberlain, Genie, and Craftsman.
1. Close the Door Completely
You cannot properly re-engage the trolley if the door is open or halfway up. The alignment between the carriage and the attachment point is designed for the closed position.
- Manually lower the door until it sits flush against the floor.
- Ensure the tracks are clear of debris that might prevent full closure.
- Lock the door manually if possible to prevent movement during the reset.
2. Locate the Trolley Latch
Look at the rail above the door. You will see the trolley (the part connected to the arm that goes to the door). Near the motor unit, there is a metal latch or lever on the trolley.
- On chain-drive models, this is often a spring-loaded clip facing the motor.
- On belt-drive models, it may be a sliding collar or a pivoting lever.
- Identify the direction indicated by arrows stamped into the metal; this shows the engagement path.
3. Move the Trolley Toward the Motor
With the power disconnected, grasp the trolley firmly. Slide it along the rail toward the motor unit until it meets the drive mechanism.
- Apply steady pressure. You should feel resistance as the internal spring compresses.
- Do not force it violently. If it stops abruptly, check for obstructions in the rail.
- Align the latch holes or teeth precisely. Misalignment causes premature wear.
4. Engage the Latch Mechanism
This is the core step in learning how to reset garage door opener after pulling cord.
- Push the latch lever toward the door (or in the direction of the arrow) until you hear/feel a definitive click.
- Visually confirm the latch has seated into the carriage slot.
- Gently tug the trolley away from the motor to verify it is locked. It should not slide freely.
5. Restore Power and Test
Reconnect electricity and perform a controlled test cycle.
- Stand clear of the door path.
- Press the wall button (not the remote, for better visibility).
- Observe the first 6 inches of travel. The door should move smoothly with the motor.
- Listen for grinding or slipping sounds which indicate incomplete engagement.
Troubleshooting: What If It Won’t Re-Engage?
Even with perfect technique, older units can be stubborn. Here is how to diagnose persistent issues:
The Latch Is Bent or Broken
Years of use can fatigue the metal latch. Inspect it closely with a flashlight. If the metal appears warped, cracked, or the spring is missing, replacement is necessary. These parts are typically available at local hardware stores for under $15.
Rail Alignment Issues
If the trolley binds before reaching the engagement point, the rail may be misaligned. Check mounting brackets for looseness. A rail that sags even ¼ inch can prevent proper latching. Tighten all bolts and ensure the rail is level relative to the ceiling.
Drive Gear Wear
If the trolley engages but slips immediately under load, the internal drive gear may be stripped. This is common in units over 10 years old. While not directly related to the cord pull, the disconnection event sometimes exposes pre-existing wear.
Frequently Asked Questions (FAQ)
Q1: Can I reset the garage door opener while the door is open?
Technically yes, but it is strongly discouraged. Re-engaging with the door open requires holding the heavy door steady while manipulating the latch, creating significant pinch-point hazards. Always close the door first for safe, aligned re-engagement.
Q2: Will pulling the cord damage my garage door opener?
No, pulling the emergency release cord is a designed function and will not damage the opener. Damage occurs only from forcing the trolley back incorrectly, running the motor while disengaged for extended periods, or attempting re-engagement with a broken spring system.
Q3: How often should I test the emergency release cord?
Industry experts recommend testing the release and reset procedure twice annually, ideally during seasonal maintenance checks. Regular testing prevents the latch from seizing due to dust, rust, or lack of use, ensuring it functions when you actually need it in an emergency.
Q4: My opener has a battery backup—do I still need to pull the cord during outages?
Not necessarily. Battery backups are designed to operate the door automatically during power loss. Only pull the cord if the battery is dead, the motor is malfunctioning, or you need to move the door faster than the battery allows. Reserve the cord for true emergencies.
Q5: Why does my door reverse immediately after resetting?
This usually indicates the safety sensors are misaligned or obstructed, unrelated to the cord reset. However, if the trolley isn’t fully engaged, the motor may sense excessive resistance and trigger the auto-reverse safety feature. Re-verify latch engagement and check sensor alignment.
Q6: Is professional help required to reset the opener?
For standard re-engagement, no. This is a homeowner-level task requiring no special tools. However, if the latch is broken, springs are damaged, or the door won’t stay closed after resetting, hire a licensed technician. Garage door springs contain enough stored energy to cause severe injury.
Conclusion
Mastering how to reset garage door opener after pulling cord transforms a frustrating malfunction into a simple five-minute fix. By understanding the mechanics, prioritizing safety, and following systematic re-engagement steps, you maintain both convenience and security without unnecessary service expenses. Remember: patience during alignment prevents damage, and regular testing ensures reliability when emergencies strike.
Found this guide helpful? Share it with fellow homeowners on Facebook, Nextdoor, or Pinterest! Your share could save a neighbor from being stranded outside their garage on a rainy night. Bookmark this page for future reference, and don’t hesitate to leave a comment below with your specific opener model—we love helping our community troubleshoot together! 🔧🏠



Leave a Reply