Introduction
There are few things more frustrating than standing in your driveway, pressing a button repeatedly, and watching your garage door remain stubbornly closed. If you have recently purchased a replacement remote or moved into a home with an existing system, figuring out how to setup a universal Chamberlain garage door opener can feel like solving a complex puzzle without the picture on the box. We understand that you just want secure, reliable access to your home without spending hours deciphering confusing manuals or worrying about compatibility. This comprehensive guide is designed to walk you through the process safely and efficiently, ensuring your system works perfectly the first time.
Understanding Chamberlain Universal Remote Compatibility
Before you begin pressing buttons, it is vital to understand that “universal” does not always mean “compatible with everything.” Chamberlain (and its sister brand, LiftMaster) has utilized several different radio frequencies and security protocols over the last three decades. According to technical documentation referenced in the Wikipedia entry for Garage Door Openers, modern openers utilize rolling code technology to prevent signal interception, which requires specific synchronization steps that older fixed-code systems do not.
Frequency and Color Code Matching
To avoid wasted time, verify your opener’s compatibility using the “Learn Button” color test. This is the industry standard for identifying generation:
- Yellow Learn Button (2011–Present): Uses Security+ 2.0 (315 MHz). Compatible with most current universal remotes.
- Purple Learn Button (2006–2014): Uses Security+ (315 MHz). Requires remotes specifically listing “Security+” compatibility.
- Orange/Red Learn Button (1997–2005): Uses Security+ (390 MHz). Older universal remotes may be needed.
- Green Learn Button (Pre-1997): Fixed code/DIP switches. Many modern universal remotes cannot operate these units.
Expert Tip: Always check the manufacturing date sticker on your motor head. If your unit was manufactured before 1993, it likely lacks photo-eye safety sensors. While you can program a remote to it, upgrading the entire unit is strongly recommended for safety compliance.
Step-by-Step: How To Setup A Universal Chamberlain Garage Door Opener
Once compatibility is confirmed, follow this precise tutorial. Most universal Chamberlain remotes use a similar programming logic, but always defer to your specific model’s manual if these steps differ.
Step 1: Prepare Your Equipment and Safety Zone
Ensure your garage door area is clear of people, pets, and obstacles. Have a stepladder ready if your motor head is mounted high. You will need:
- The universal remote with fresh batteries (CR2032 or AAA depending on model).
- The original owner’s manual (or digital PDF).
- A small flathead screwdriver (for battery compartment or visor clip).
Step 2: Locate and Clear the Learn Button
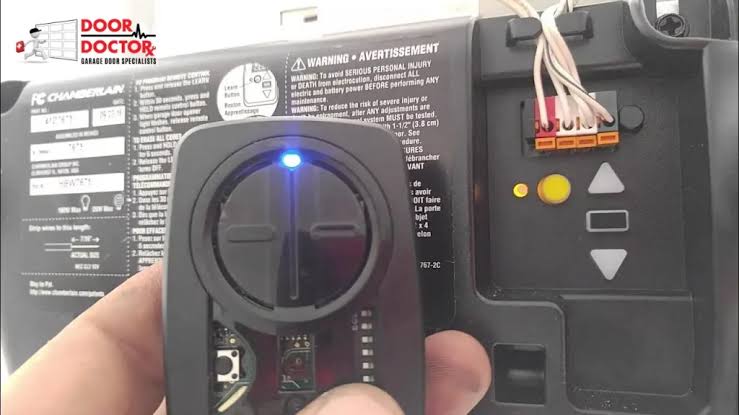
Find the “Learn” or “Smart” button on the back or side of the garage door opener motor unit. It is typically located near the hanging antenna wire.
- Press and hold the Learn button for 6 seconds until the LED light turns off. This clears all previous remote codes from memory.
- Release the button. The LED should now be dark.
- Note: This step is optional if you only want to add a new remote without deleting old ones. However, if you are setting up a universal remote to replace lost ones, clearing memory prevents ghost signals.
Step 3: Program the Universal Remote
This is the core action for how to setup a universal Chamberlain garage door opener:
- Press and release the Learn button on the motor unit. The LED will illuminate steadily or begin blinking (depending on model). You now have 30 seconds to complete the next step.
- On your universal remote, press and hold the button you wish to program.
- Watch the motor unit’s LED. It should flash or click twice to confirm successful pairing.
- Release the remote button immediately upon confirmation.
Step 4: Test and Verify Safety Sensors
Never assume the setup is complete after the door moves. Test the safety reversal system:
- Place a 2×4 board flat on the floor under the center of the door.
- Activate the door to close.
- The door must reverse within 2 seconds of contacting the wood.
- If it does not reverse, adjust the force settings on the motor unit or realign the photo-eye sensors before further use.
Troubleshooting Common Programming Failures
Even professionals encounter hiccups. Use this table to diagnose issues quickly:
| Symptom | Probable Cause | Solution |
|---|---|---|
| LED flashes but door doesn’t move | Battery weak or incorrect frequency | Replace battery; verify Learn button color match |
| Remote programs but stops working after 24 hrs | Capacitor failure in motor logic board | Professional service required; board replacement |
| Door opens but won’t close via remote | Photo-eye misalignment or obstruction | Clean sensor lenses; ensure solid green/amber lights |
| Intermittent operation | RF interference from LED bulbs | Replace garage LED bulbs with RFI-shielded models |
| Learn button light never illuminates | Blown fuse or transformer failure | Check power outlet; test voltage at motor terminals |
The LED Bulb Interference Issue
A frequently overlooked problem involves aftermarket LED lighting. Cheap LED drivers emit radio frequency noise that jams the 315 MHz signal used by Chamberlain openers. If your remote range dropped significantly after installing new lights, swap them for Chamberlain-approved LED bulbs or verified low-interference alternatives. Studies from consumer electronics testing labs show that unshielded LEDs can reduce effective remote range by up to 70%.
FAQ: Universal Chamberlain Garage Door Opener Setup
Can I program a universal Chamberlain remote to a non-Chamberlain opener?
Generally, no. Chamberlain universal remotes are designed specifically for Chamberlain, LiftMaster, and Craftsman openers (all manufactured by the Chamberlain Group). They typically cannot communicate with Genie, Overhead Door, or other brands unless explicitly stated on the packaging. Always cross-reference the compatibility list before purchasing.
Why does my remote work inside the garage but not from my car?
This indicates a range issue rather than a programming failure. First, replace the remote battery even if it seems functional. Second, check for LED bulb interference as described above. Third, inspect the hanging antenna wire; it should be fully extended and not coiled. If problems persist, the motor unit’s receiver module may be degrading and require professional diagnosis.
Do I need to reprogram my remote after changing the battery?
No. Programming is stored in non-volatile memory on both the remote and motor unit. Changing the battery will not erase your settings. However, if you perform a factory reset on the motor unit or replace its logic board, all remotes must be reprogrammed from scratch.
Is it safe to use a universal remote with an older garage door opener?
Safety depends on the opener’s age, not the remote type. Any opener manufactured after January 1, 1993, is federally mandated to include photoelectric safety sensors. Using a universal remote with a pre-1993 unit is technically possible but poses significant entrapment risk. We strongly recommend upgrading to a modern opener with auto-reverse and battery backup features regardless of remote compatibility.
How many remotes can one Chamberlain opener store?
Most Security+ 2.0 (yellow learn button) units can store up to 30 remote controls and 2 keypads. Older Security+ (purple/orange) models typically support 15–20 devices. Exceeding this limit causes the oldest programmed device to be overwritten. For households with many users, consider a keypad entry system to reduce remote clutter.
What if my universal remote has multiple buttons for different doors?
Each button operates independently. Repeat the full programming sequence for each button, assigning it to the corresponding motor unit. Label the buttons immediately with masking tape or a permanent marker to avoid confusion during emergencies. Some advanced universal remotes allow you to name buttons via companion apps; consult your specific model’s documentation for smart features.
Conclusion
Mastering how to setup a universal Chamberlain garage door opener empowers you to maintain home security and convenience without unnecessary service calls. By verifying compatibility through the Learn button color test, following precise programming steps, and validating safety systems afterward, you ensure reliable operation for years to come. Remember that troubleshooting often comes down to simple fixes like battery replacement or LED bulb swaps rather than complex repairs.
Your garage is the primary entry point to your home; keeping it functioning smoothly matters. If this guide helped you resolve your setup challenges, please share it on social media to assist fellow homeowners facing the same frustrations. Tag us in your posts—we love seeing your DIY wins! Safe programming, and may your door always open when you need it.



Leave a Reply