Are you considering upgrading your garage with smart home technology? Installing a Myq garage door opener is a great way to add convenience, security, and peace of mind to your home. In this guide, we’ll walk you through the process of installing a Myq garage door opener step by step, so you can enjoy the benefits of smart garage access in no time.
Why Choose Myq Garage Door Opener?
Before we dive into the installation process, let’s briefly discuss why Myq garage door openers are a popular choice for homeowners:
- Remote Access: Myq garage door openers allow you to control your garage door remotely using a smartphone app. This means you can open, close, and monitor your garage door from anywhere, providing added convenience and security.
- Smart Home Integration: Myq integrates seamlessly with popular smart home platforms like Amazon Alexa and Google Assistant, allowing you to control your garage door with voice commands and incorporate it into your smart home ecosystem.
- Real-Time Alerts: With Myq, you’ll receive instant alerts on your smartphone whenever your garage door is opened or closed, giving you peace of mind and enabling you to monitor garage activity remotely.
Read too: Mastering the Art of How to Open a Garage Door Safely and Efficiently
Step-by-Step Guide to Installing Myq Garage Door Opener
1. Gather Your Tools and Materials
Before you begin, make sure you have the following tools and materials on hand:
- Myq garage door opener kit
- Power drill
- Screwdriver
- Measuring tape
- Level
- Ladder
- Safety glasses
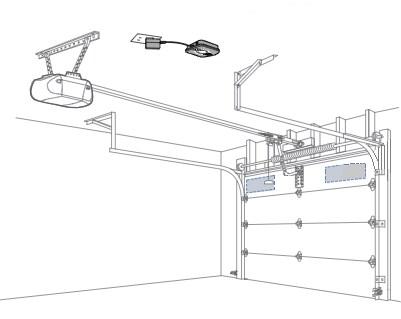
2. Prepare Your Garage Door
Start by disconnecting your garage door from the power source and removing any existing garage door opener hardware. Follow the manufacturer’s instructions for safely disconnecting and removing the old opener.
3. Install the Myq Smart Hub
Mount the Myq smart hub near your garage door opener motor using the provided screws and anchors. Ensure that the hub is positioned securely and is within range of your Wi-Fi network.
4. Connect the Myq Sensors
Attach the Myq door sensors to the top panel of your garage door using the adhesive backing. Make sure the sensors are aligned properly and securely attached to the door.
5. Install the Myq Garage Door Opener
Mount the Myq garage door opener to the ceiling of your garage using the provided hardware. Use a level to ensure that the opener is installed evenly and securely.
6. Connect to Wi-Fi and Configure Settings
Follow the instructions in the Myq app to connect the smart hub to your Wi-Fi network. Once connected, you can configure settings such as door alerts, remote access, and smart home integration.
7. Test the Garage Door Opener
After completing the installation, test the Myq garage door opener to ensure that it is functioning properly. Use the app to open and close the garage door remotely, and verify that the door sensors are detecting movement accurately.
Conclusion
By following these simple steps, you can install a Myq garage door opener in your home and enjoy the convenience and security of smart garage access. With remote control capabilities, real-time alerts, and seamless integration with your smart home ecosystem, Myq makes managing your garage easier than ever before.
Leave a Reply