Introduction
There is nothing quite as frustrating as sitting in your driveway, pressing the button in your car, and watching your garage door remain stubbornly closed. You just want the convenience of opening your garage without fumbling for a separate remote, but the technology seems to be working against you. If you are wondering how to program HomeLink to Liftmaster garage door opener, you are not alone; this is one of the most common technical hurdles for homeowners with newer vehicles and reliable Liftmaster systems.
The good news is that the process is straightforward once you understand the specific “language” your car and garage door need to speak to each other. In this guide, we will walk you through every step, troubleshoot common issues, and ensure you can drive in seamlessly every time.
Understanding the Connection: Why It Sometimes Fails
Before diving into the buttons, it helps to understand why this process isn’t always plug-and-play. HomeLink is a universal transceiver built into many vehicles (Ford, Honda, Toyota, BMW, etc.), while Liftmaster uses specific radio frequencies and security protocols.
According to industry standards, most modern garage door openers operate on either 315 MHz or 390 MHz frequencies. However, the real challenge lies in the security encryption. Modern Liftmaster openers use “rolling code” technology to prevent theft. This means the code changes every time you press the button. Your car’s HomeLink system must learn this changing code, which requires a specific synchronization process rather than a simple copy-paste action.
Expert Insight: “The majority of programming failures occur because users skip the ‘clearing’ phase or do not hold the buttons long enough during the learning mode. Patience is key.” — Senior Technical Support Specialist, Major Automotive Retailer.
For more detailed technical specifications on radio frequency standards, you can refer to the general overview on Wikipedia.
Step-by-Step Guide: How to Program HomeLink to Liftmaster
This method works for the vast majority of Liftmaster models (including the popular 8500, 8550, and MyQ-enabled series) and most vehicles equipped with HomeLink.
Step 1: Clear Previous HomeLink Codes
If your HomeLink buttons have been used before, you must clear them to avoid interference.
- Turn your vehicle’s ignition to the “On” or “Accessory” position.
- Press and hold the two outer HomeLink buttons simultaneously.
- Keep holding for about 20–30 seconds until the indicator light begins to flash rapidly.
- Release the buttons. The memory is now cleared.
Step 2: Put Your Liftmaster Opener in “Learn” Mode
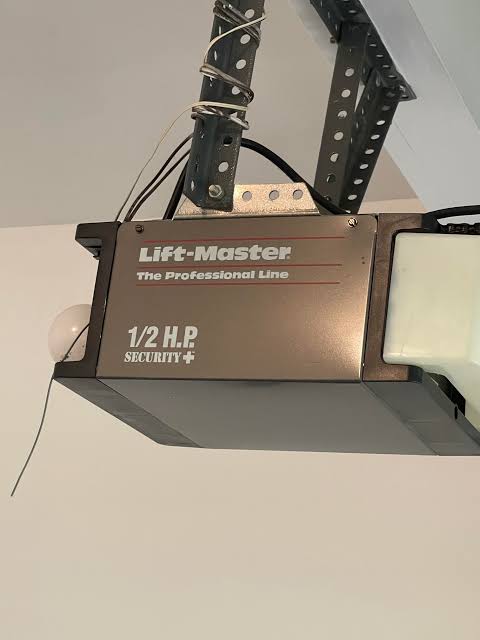
You will need a ladder or step stool to reach the motor unit hanging from your garage ceiling.
- Locate the “Learn” button on the back or side of the Liftmaster motor head. It is usually colored yellow, purple, orange, or red, depending on the model year.
- Press and release the Learn button. The indicator LED next to it will turn on or start blinking.
- Note: You typically have 30 seconds to complete the next step before the opener times out.
Step 3: Train the HomeLink Button
- Return to your vehicle.
- Position your car about 2–5 feet away from the garage door opener motor.
- Press and hold the desired HomeLink button in your car.
- While holding the HomeLink button, press and hold the original handheld remote button (if you have one) close to the HomeLink buttons. If you do not have the original remote, simply hold the HomeLink button.
- Watch the HomeLink indicator light. It will slowly change from a slow blink to a rapid flash.
- Once it flashes rapidly, release both buttons.
Step 4: Finalize the Sync
- Go back to the Liftmaster motor unit.
- Press the “Learn” button again briefly.
- Immediately return to your car and press the programmed HomeLink button three times in succession.
- The garage door should activate. If it does, the programming is successful.
| Step | Action | Expected Result |
|---|---|---|
| 1 | Clear HomeLink | Light flashes rapidly |
| 2 | Press Learn Button | LED on motor lights up |
| 3 | Hold HomeLink + Remote | Light changes from slow to fast blink |
| 4 | Press HomeLink 3x | Garage door moves |
Troubleshooting Common Issues
Even with careful following of instructions, things can go wrong. Here are the most frequent problems and how to fix them.
The Door Moves Up but Not Down (or Vice Versa)
This is a safety sensor issue, not a programming issue. Check the photo-eye sensors near the floor of your garage. Ensure they are aligned and free of dirt or spiderwebs. If the beam is blocked, the door will refuse to close for safety reasons.
The HomeLink Light Flashes But Nothing Happens
This usually indicates a frequency mismatch or that the “Learn” mode timed out.
- Solution: Repeat Step 2 and Step 3 faster. Ensure you are within range. Some older Liftmaster models require you to press the Learn button twice for certain frequencies. Consult your specific Liftmaster manual if this persists.
“Rolling Code” Compatibility Errors
If you have a very old Liftmaster (pre-1997) or a very new vehicle with advanced encryption, you might need a compatibility bridge.
- Solution: Purchase a Liftmaster Universal Remote Compatibility Bridge (often sold as part number 855LM). This small device plugs into the opener and translates the signal for older or newer HomeLink systems.
Alternative Method: Using the Liftmaster App (MyQ)
If physical programming fails, or if you prefer a digital approach, consider the Liftmaster MyQ ecosystem. While this doesn’t strictly “program” the car’s built-in button, it offers a superior alternative for many users.
- Install the MyQ smart garage hub on your opener.
- Download the MyQ app on your smartphone.
- Use your phone’s Bluetooth or GPS location to trigger the door automatically when you arrive home.
Pros of MyQ:
- No need to climb ladders.
- Works with any car, even those without HomeLink.
- Allows remote access from anywhere in the world.
Cons of MyQ:
- Requires Wi-Fi in the garage.
- Subscription fees may apply for advanced features.
FAQ Section
1. Do I need the original remote to program HomeLink?
Ideally, yes. Having the original handheld remote makes the “cloning” process easier and more reliable. However, if you have lost the remote, you can still program HomeLink directly by holding the HomeLink button and pressing the Learn button on the motor unit, though it may take a few more attempts to sync the rolling code.
2. Why does my HomeLink work intermittently?
Intermittent issues are often caused by weak batteries in the vehicle or interference from LED light bulbs in the garage. LED bulbs can emit radio frequency noise that interferes with the 315/390 MHz signal. Try replacing the garage opener’s light bulb with an incandescent bulb or a specialized RF-shielded LED to see if performance improves.
3. Can I program multiple cars to one Liftmaster opener?
Yes. Liftmaster openers can store dozens of different remote codes. Simply repeat the programming steps for each vehicle. Each car will have its own unique code stored in the opener’s memory.
4. What if my car doesn’t have HomeLink?
If your vehicle lacks built-in HomeLink, you can purchase a universal visor clip remote. These are small, battery-operated remotes that stick to your sun visor. They are inexpensive and can be programmed using the same “Learn” button method described above.
5. Is it safe to leave my garage door opener in “Learn” mode?
No. The “Learn” mode should only be active for the 30 seconds required to program a device. If left open, anyone nearby could potentially program their own remote to open your garage. Always ensure the LED on the motor unit is off after programming.
6. Does resetting HomeLink delete my other car settings?
No. Clearing HomeLink only deletes the garage door codes stored in those specific buttons. It does not affect your seat memory, radio presets, or other vehicle configurations.
Conclusion
Learning how to program HomeLink to Liftmaster garage door opener transforms a daily chore into a seamless experience. By clearing old codes, utilizing the Learn button correctly, and understanding the rolling code technology, you can ensure a secure and reliable connection between your vehicle and your home.
Remember, patience is vital. If the first attempt doesn’t work, double-check your timing and ensure your vehicle is close enough to the motor unit. With these steps, you’ll be driving into an open garage in no time.
Did this guide help you get connected? Share this article with friends who are struggling with their garage remotes, or drop a comment below if you have a unique troubleshooting tip that worked for you!



Leave a Reply