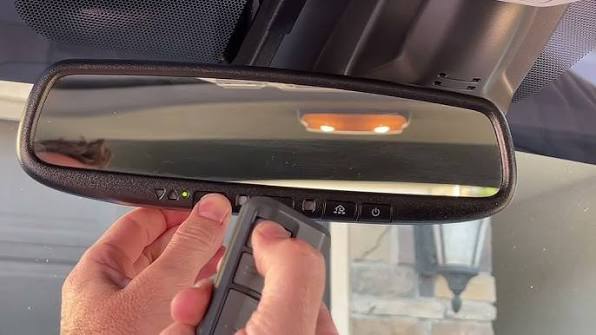
Tired of digging through your bag or cup holder for a clunky remote every time you get home? Figuring out how to program rear view mirror garage door opener systems is much easier than you might think, and it completely eliminates the daily clutter. Let’s get your built-in system synced up so you can pull into your driveway with seamless, hands-free convenience!
Understanding Your Built-In System
Before we dive into the steps, it helps to know what you are working with. Most modern vehicles in the US come equipped with a universal transmitter system, widely known by the brand name HomeLink. This system is integrated directly into your rearview mirror or overhead console.
Instead of relying on a physical remote, these systems use radio frequencies to communicate with your Garage door opener motor. According to a 2025 smart home automotive report, over 70% of new vehicles feature these integrated transmitters. However, because every garage motor manufacturer uses different security protocols, the initial pairing process can feel a bit like solving a puzzle.
Don’t worry! We are going to break this down into simple, actionable steps.
Step-by-Step: How To Program Rear View Mirror Garage Door Opener
To ensure success, you will need two things: your car’s owner’s manual and your original, handheld garage door remote. Let’s get started.
Phase 1: Clear Previous Memory
If you recently bought a used car, the previous owner’s codes might still be active. We need a clean slate.
- Turn your car’s ignition to the “Accessory” or “On” position. Do not start the engine.
- Locate the three HomeLink buttons on your rearview mirror or visor.
- Press and hold the two outer buttons simultaneously.
- Hold them for exactly 15 to 20 seconds.
- Watch the indicator light. It will begin to flash rapidly. Once it flashes, release the buttons. Your mirror’s memory is now wiped clean!
Phase 2: Syncing the Signal (Standard Fixed Code)
If you have an older garage door system (built before 1996), it likely uses a fixed code. Here is how to link it:
- Hold your handheld remote 1 to 3 inches away from your rearview mirror.
- Simultaneously press and hold the button on your handheld remote and the HomeLink button you wish to program.
- Keep holding both buttons. The HomeLink LED will flash slowly at first, then rapidly once it catches the frequency.
- Release both buttons. Test the mirror button. If the door moves, you are finished!
Phase 3: The “Rolling Code” Training
If your garage door uses modern “rolling code” technology (which changes the access code every time you use it to prevent hacking), you need an extra step.
- Go to your actual garage door motor mounted on the ceiling.
- Find the “Learn” or “Smart” button. It is usually located on the back or side panel and might be colored yellow, purple, orange, or red.
- Press and quickly release this button. An LED light near it will turn on, indicating the motor is in “learning mode” for the next 30 seconds.
- Rush back to your car! Press and hold your newly programmed HomeLink button for 2 seconds, then release.
- Repeat this press-and-hold process a second time. On the third time, your garage door should activate, confirming the secure link.
Pros vs. Cons: Built-In Mirror Openers
Is the effort of learning how to program rear view mirror garage door opener systems really worth it? Let’s look at the data.
| Feature | Built-In Mirror Opener (Pros) | Built-In Mirror Opener (Cons) |
|---|---|---|
| Convenience | Never lose your remote; always attached to your vehicle. | Difficult to use if you are outside the car or in a different vehicle. |
| Aesthetics | Keeps your car interior free of dangling remotes and clutter. | Requires reading the manual to understand specific vehicle quirks. |
| Security | Uses advanced rolling code encryption natively. | If your car is stolen, thieves have direct access to your home. |
| Multi-Device | Can usually program up to 3 different doors or gates. | Cannot easily share access with guests without reprogramming. |
Troubleshooting: What If It Won’t Sync?
Even expert technicians run into snags. If your rearview mirror refuses to cooperate, check these common culprits:
- Weak Remote Battery: If the battery in your handheld remote is dying, it won’t transmit a strong enough signal to the mirror. Swap in a fresh CR2032 battery before trying again.
- LED Bulb Interference: Did you recently upgrade your garage to LED light bulbs? Cheap LED bulbs emit electromagnetic interference that blocks radio frequencies. Try unscrewing the bulbs temporarily, syncing the mirror, and then putting the bulbs back in.
- Frequency Mismatch: Older cars (pre-2014) might operate on 315 MHz, while your new LiftMaster or Chamberlain motor uses 310 MHz or 390 MHz. If this happens, you may need to purchase a “HomeLink Compatibility Bridge” to bridge the gap.
- Safety First: Always keep your hands and tools clear of the door tracks and springs while testing the motor!
Frequently Asked Questions (FAQ)
Q: How do I reset my HomeLink rear view mirror buttons?
A: To perform a full factory reset, turn your ignition on and press and hold the two outer HomeLink buttons for about 20 seconds. Wait until the indicator light flashes rapidly, then release. This erases all programmed devices, including gates and front door locks.
Q: Can I program a mirror opener without an old remote?
A: Generally, no. You need an existing remote to “clone” the frequency into your car’s mirror during Phase 2. If you have lost all your remotes, you will need to buy a new universal remote compatible with your garage motor first, or manually reset the motor’s internal receiver board.
Q: Why does my garage door open, but the mirror light keeps flashing?
A: A continuously flashing light usually means the mirror has recognized the fixed code but hasn’t completed the “rolling code” security handshake. You simply need to revisit Phase 3 of our guide and press the “Learn” button on your garage ceiling motor to finalize the secure connection.
Q: Can I program my mirror to open my community gate and my home garage?
A: Absolutely! Most systems support up to three distinct buttons. You can dedicate Button 1 to your home garage, Button 2 to your community gate, and Button 3 to your smart home lighting system, provided they all use compatible radio frequencies.
Conclusion
Mastering how to program rear view mirror garage door opener technology transforms your daily routine from frustrating to effortless. By following these clear steps, you eliminate the need for bulky visor clips and lost remotes, upgrading your home’s security and convenience in just a few minutes.
Did this guide save you from a headache at the end of a long workday? Share this article on your favorite social media platform to help a friend sync their car today, and let us know in the comments which brand of garage motor you successfully paired!



Leave a Reply