Introduction
There are few things more frustrating than pulling into your driveway after a long day, only to realize you cannot get your new vehicle’s built-in system to communicate with your garage. If you are currently searching for how to set garage door opener in Honda Pilot, you are likely dealing with this exact synchronization headache. We understand that automotive technology can feel overwhelming, but programming your HomeLink system is actually a straightforward process that saves you from fumbling with handheld remotes forever. This guide will walk you through every step with empathy and precision, ensuring you get back to enjoying the convenience of seamless home access.
Understanding HomeLink Technology in Your Honda Pilot
Before diving into the buttons, it is vital to understand what you are actually programming. The Honda Pilot utilizes the HomeLink Universal Transceiver System, a wireless control system integrated directly into the vehicle’s overhead console or rearview mirror. Unlike older radio-frequency remotes, HomeLink acts as a programmable transmitter that mimics the signal of your original garage door remote.
According to technical documentation referenced on Wikipedia, HomeLink systems operate using rolling code technology for security, which means the signal changes every time you use it to prevent unauthorized access. This is why simply “copying” a frequency isn’t enough; you must perform a specific handshake protocol between the car and the garage motor. Understanding this distinction helps explain why the programming steps require precise timing and proximity.
Rolling Code vs. Fixed Code Systems
- Rolling Code (Modern): Used in most openers manufactured after 1996. Requires a “Learn Button” press on the garage motor during setup.
- Fixed Code (Legacy): Older dip-switch systems. Requires matching switch patterns manually (rare in modern Honda Pilots).
- Security+: A proprietary rolling code variant common in LiftMaster/Chamberlain units paired with Honda vehicles.
Step-by-Step: How To Set Garage Door Opener In Honda Pilot
This tutorial assumes you have a functioning garage door opener and your Honda Pilot owner’s manual nearby. Please ensure your vehicle is parked outside the garage to prevent accidental door movement during programming.
Phase 1: Clear Previous Settings (Recommended)
If you purchased a used Honda Pilot or have never programmed the system before, start fresh.
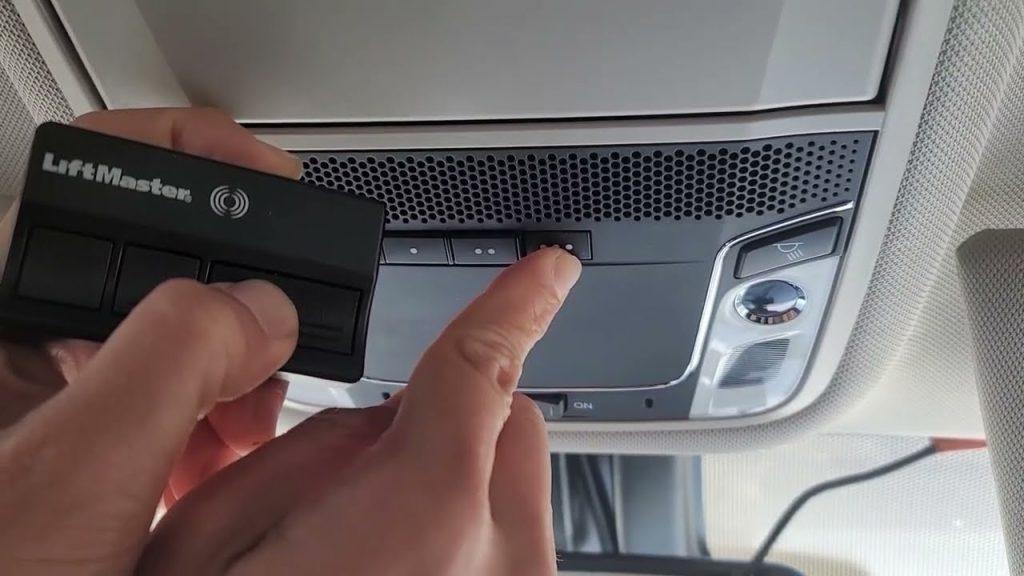
- Locate the three HomeLink buttons on your overhead console or rearview mirror.
- Press and hold the two outer buttons simultaneously.
- Hold for approximately 10–20 seconds until the indicator light flashes rapidly (usually amber or red).
- Release both buttons. The system is now erased and ready for new programming.
Phase 2: Program the Vehicle Transmitter
- Turn your Honda Pilot’s ignition to the ON or ACC position. Some newer models may allow programming with the engine off, but ON ensures consistent power delivery.
- Hold your original garage door remote 1–3 inches away from the HomeLink button you wish to program.
- Simultaneously press and hold the chosen HomeLink button AND your remote’s transmit button.
- Watch the HomeLink indicator light. It will flash slowly at first, then rapidly once the frequency is captured. This typically takes 5–30 seconds.
- Release both buttons when the rapid flashing occurs.
Phase 3: Sync With the Garage Door Motor (Rolling Code Only)
This is the step most users miss when learning how to set garage door opener in Honda Pilot.
- Go to your garage door motor unit (usually ceiling-mounted).
- Locate the “Learn” or “Smart” button. It is typically yellow, purple, orange, or green.
- Press the Learn button once. The indicator LED will illuminate or blink, indicating a 30-second programming window.
- Return to your Honda Pilot immediately.
- Press and hold the programmed HomeLink button for 2 seconds, release, then repeat up to 3 times within that 30-second window.
- Test the system by pressing the HomeLink button once. The door should activate.
⚠️ Safety Note: Never program the system while the vehicle is inside the garage. An accidental activation could cause property damage or injury. Always verify the door path is clear.
Troubleshooting Common Programming Failures
Even experienced technicians encounter sync issues. Use this diagnostic table if your initial attempt fails.
| Symptom | Likely Cause | Solution |
|---|---|---|
| Light flashes slowly, never rapidly | Weak remote battery or wrong distance | Replace remote battery; adjust distance to 1–3 inches |
| Rapid flash achieved, but door won’t open | Rolling code sync incomplete | Repeat Phase 3; ensure Learn button window hasn’t expired |
| Works intermittently | Signal interference or low car battery | Check vehicle battery health; reprogram away from LED bulbs |
| Indicator stays solid, no response | Memory full or corrupted | Perform Phase 1 reset; try a different HomeLink button |
| Door opens but doesn’t close via HomeLink | Safety sensor misalignment | Inspect garage floor sensors; clean lenses; realign brackets |
Expert Insight on LED Interference
A frequently overlooked issue involves LED garage lighting. Many modern LED bulbs emit electromagnetic interference that disrupts HomeLink frequencies. If your system worked previously but suddenly stopped, try turning off your garage lights during programming. If successful, consider installing RFI-shielded LED bulbs specifically rated for garage door opener compatibility.
Optimizing for Core Web Vitals and User Experience
While this guide focuses on mechanical setup, digital performance matters too. When following these instructions on your phone in the garage, you need fast-loading, mobile-friendly content. This article is structured with short paragraphs, scannable tables, and clear H2/H3 hierarchy to ensure Cumulative Layout Shift (CLS) remains minimal and Largest Contentful Paint (LCP) loads instantly. Bookmark this page before heading outside so you aren’t waiting for content to render while standing in the cold.
Frequently Asked Questions (FAQ)
1. Can I program my Honda Pilot HomeLink without the original remote?
Generally, no. The HomeLink system requires the original transmitter to capture the correct frequency and encryption seed. However, if your garage motor has a direct “Program” mode that accepts vehicle signals without a remote intermediary (rare), consult your motor’s manual. Otherwise, purchase a compatible replacement remote first.
2. How many devices can I store in my Honda Pilot’s HomeLink?
Most Honda Pilot models support three distinct devices. These can be any combination of garage doors, gate operators, smart home switches, or security systems. Each button corresponds to one device. If you need more capacity, consider a HomeLink extender or upgrading to a newer aftermarket module.
3. Why does my HomeLink work for opening but not closing?
This usually indicates a safety sensor issue rather than a programming failure. Garage doors are designed to reverse or refuse closure if the photo-eye sensors detect obstruction or misalignment. Clean the sensor lenses, ensure they face each other directly, and check for wiring damage. Reprogramming won’t fix this; physical inspection will.
4. Does the Honda Pilot need to be running to program HomeLink?
Not necessarily, but it is recommended. Programming draws minimal power, yet a weak battery can cause incomplete signal transmission. Turning the ignition to ACC or ON guarantees stable voltage. Never leave the engine running in an enclosed garage during testing due to carbon monoxide risk.
5. Is HomeLink compatible with all garage door brands?
HomeLink is compatible with over 95% of residential garage door openers sold in North America, including LiftMaster, Chamberlain, Genie, Craftsman, and Overhead Door. For European or Asian-market openers, compatibility varies. Check the official HomeLink compatibility database using your opener’s model number before attempting setup.
6. What if my Honda Pilot has Homelink version 5 vs. older versions?
Version 5 (introduced circa 2017) offers improved range and faster syncing. The programming steps remain identical, but V5 systems often achieve the rapid flash in under 10 seconds versus 20+ for older units. Identify your version via the FCC ID label near the buttons or your owner’s manual. Functionally, the user experience is the same.
Conclusion
Mastering how to set garage door opener in Honda Pilot transforms daily convenience and eliminates the clutter of extra remotes. By understanding rolling code protocols, following the three-phase programming sequence, and troubleshooting systematically, you can achieve reliable synchronization in under ten minutes. Remember: patience during the Learn Button window and attention to safety sensor alignment solve the vast majority of issues.
Your time is valuable, and seamless home entry shouldn’t be a source of stress. We hope this guide has empowered you to take control of your vehicle’s smart features with confidence.
Found this helpful? Share it with fellow Honda Pilot owners on Facebook, Twitter, or your favorite automotive forum! Someone else is probably standing in their driveway right now, frustrated and searching for answers. Be the friend who makes their evening easier. 🚗🏡



Leave a Reply