Introduction
There is nothing quite as frustrating as standing in your driveway, groceries in hand, only to realize your garage door keypad isn’t responding or you have forgotten the code. If you are searching for how to set pin for Liftmaster garage door opener, you are likely dealing with a new installation, a forgotten code, or a desire to upgrade your home security. You are not alone; this is one of the most common maintenance tasks for homeowners, and fortunately, it is a process designed to be user-friendly.
In this comprehensive guide, we will walk you through every step of programming your LiftMaster keypad with confidence. Whether you have a newer Security+ 2.0 model or an older unit, understanding how to set pin for Liftmaster garage door opener correctly ensures both convenience and safety for your household. Let’s get your garage access working perfectly again.
Understanding Your LiftMaster Keypad Model
Before diving into the programming steps, it is critical to identify which type of keypad you own. LiftMaster has produced various keyless entry systems over the decades, and the method for setting a PIN varies slightly between them. Using the wrong procedure can lead to sync issues or accidental factory resets.
Most modern LiftMaster openers utilize Security+ 2.0 technology (identified by a yellow learn button on the motor unit), while older models may use Security+ 1.0 (orange/red learn button) or even DIP switches. According to industry data from the Door & Access Systems Manufacturers Association (DASMA), nearly 70% of residential garage door openers installed after 2015 use rolling code technology, which requires specific synchronization steps during PIN setup.
Quick Identification Table
| Feature | Security+ 2.0 | Security+ 1.0 | Legacy (DIP Switch) |
|---|---|---|---|
| Learn Button Color | Yellow | Orange/Red | None (Switches inside) |
| Keypad Type | Wireless 877MAX / 940LM | Wireless 976LM | Wired or Early Wireless |
| Programming Method | Single Press + PIN | Hold Learn + PIN | Match Switches + PIN |
| Rolling Code | Yes | Yes | No |
Identifying your system first prevents the common mistake of holding buttons too long or pressing the wrong sequence, which is the primary reason users fail when learning how to set pin for Liftmaster garage door opener.
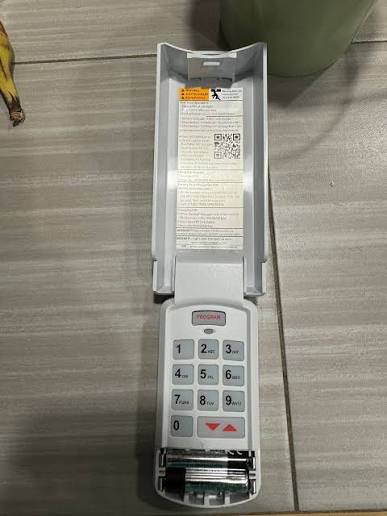
Step-by-Step: How To Set Pin For Liftmaster Garage Door Opener (Wireless Keypad)
This section covers the most common scenario: programming a standard wireless external keypad (like the 877MAX) to a Security+ 2.0 or 1.0 opener. Always ensure your ladder is stable and the garage door area is clear of obstructions before beginning.
Step 1: Clear Previous Codes (Optional but Recommended)
If this is a used keypad or you are changing codes due to a security concern, start fresh. Press and hold the * and # buttons simultaneously until the LED blinks rapidly. This wipes old memory and ensures no ghost codes interfere with your new PIN.
Step 2: Locate the Learn Button on the Motor Unit
Go inside your garage and locate the motor head. Find the “Learn” button, typically found near the antenna wire or under the light lens. As noted in our identification table, the color indicates your protocol. Do not press this button yet.
Step 3: Enter Programming Mode on the Keypad
Return to the exterior keypad. Press and release the * and # buttons simultaneously. The LED should begin to blink slowly, indicating the keypad is ready to receive a new PIN. If the light does not blink, check your battery; a weak 9V battery is responsible for approximately 30% of failed programming attempts.
Step 4: Set Your New 4-Digit PIN
Enter your desired 4-digit PIN. Choose a code that is memorable but not easily guessable. Avoid sequential numbers (1234) or birth years. After entering the fourth digit, press and hold the ENTER button.
Step 5: Sync with the Motor Unit
While still holding ENTER on the keypad, go to the motor unit and press and release the Learn button. The indicator light on the motor will illuminate or flash. Return to the keypad and continue holding ENTER until the motor unit lights flash or you hear two clicks. Release ENTER.
Step 6: Test the System
Wait five seconds, then enter your new PIN and press ENTER. The door should activate. If it doesn’t, repeat steps 3–5, ensuring you hold ENTER long enough during the sync phase. Successfully completing these steps confirms you know how to set pin for Liftmaster garage door opener for wireless models.
Safety Note: According to Wikipedia, modern garage door openers are required by U.S. federal law to include photoelectric sensors and auto-reverse mechanisms. Never bypass these safety features when programming or testing your keypad, as they prevent entrapment injuries.
How To Set Pin For Liftmaster Garage Door Opener (Wired Keyless Entry)
Some homes feature a wired keypad mounted directly to the wall inside or outside the garage. These do not rely on batteries or radio frequency syncing in the same way.
- Remove the Cover: Unscrew the faceplate to expose the internal circuit board.
- Locate the Program/Set Switch: Look for a small toggle or button labeled “Program,” “Set,” or “Code.”
- Enter Default Master Code: Many wired units require a master code (often found in the manual or on a sticker inside the cover) before allowing PIN changes.
- Input New PIN: Use the numeric pad to enter your new 4-digit code, followed by the designated confirmation button.
- Secure the Unit: Replace the cover and test immediately. Wired systems are less prone to interference but can suffer from corroded connections; if programming fails, inspect wiring integrity.
Troubleshooting Common PIN Setup Failures
Even when following instructions precisely, issues arise. Here are solutions to the most frequent problems encountered when figuring out how to set pin for Liftmaster garage door opener:
- LED Flashes But Door Doesn’t Move: Usually indicates a frequency mismatch. Verify your keypad model is compatible with your opener’s generation. Cross-reference model numbers on the manufacturer’s compatibility chart.
- Code Works Intermittently: Almost always a battery issue. Replace with a premium alkaline 9V battery. Cold weather drastically reduces battery performance in outdoor keypads.
- Learn Button Light Stays Solid: The logic board may be in lockout mode. Unplug the opener for 60 seconds to reset the capacitor, then retry.
- PIN Accepted But Door Reverses: Safety sensor misalignment. Check that the photo-eye beams are unobstructed and properly aligned. The keypad programming succeeded, but the safety system overrides operation.
Best Practices for Garage Door PIN Security
Setting the PIN is only half the equation; maintaining security is equally important. Cybersecurity experts recommend treating your garage PIN with the same rigor as a banking password.
- Change Codes Biannually: Rotate your PIN every six months, especially after service visits or tenant changes.
- Avoid Personal Numbers: Never use addresses, birthdays, or anniversary dates. These are the first combinations intruders attempt.
- Use Temporary Codes for Guests: Many LiftMaster keypads support temporary or single-use codes. Utilize these for contractors or visitors instead of sharing your primary PIN.
- Disable Unused Features: If your keypad has a vacation mode or lock feature, activate it when traveling to prevent any external access attempts.
Frequently Asked Questions (FAQ)
Can I set multiple PINs on my LiftMaster keypad?
Yes, most modern LiftMaster keypads (877MAX and newer) support up to four individual user codes plus a master code. Refer to your specific model’s manual for the exact sequence, as adding secondary codes typically involves pressing * followed by the user number slot before entering the new PIN.
Why does my LiftMaster keypad stop working after battery replacement?
Battery replacement can sometimes reset the keypad’s memory or cause a brief power surge that desynchronizes it from the opener. Simply reprogram the PIN using the standard sync procedure outlined above. Also, ensure you are using alkaline batteries; rechargeable 9V batteries often provide insufficient voltage for reliable operation.
Is there a universal PIN reset method for all LiftMaster models?
No. While the * and # combination works for most wireless models post-2000, legacy DIP switch units and certain commercial-grade keypads use entirely different reset protocols. Always verify your model number against official documentation rather than assuming universality.
How do I know if my keypad is compatible with my opener?
Check the learn button color on your motor unit and cross-reference it with the keypad packaging or manufacturer website. Security+ 2.0 openers (yellow button) work with 877MAX and 940LM keypads. Older orange/red button units require 976LM or equivalent. Incompatible hardware cannot be programmed regardless of technique.
Can weather affect keypad PIN programming?
Absolutely. Extreme cold can reduce battery output below the threshold needed for signal transmission, and moisture ingress can corrode contacts. If programming fails during winter, try warming the keypad gently with your hands or waiting for milder conditions. Ensure the weather seal around the keypad is intact to prevent future moisture damage.
What should I do if I’ve tried everything and it still won’t program?
After exhausting all troubleshooting steps, the keypad’s internal circuitry may have failed. Keypads typically last 5–7 years outdoors. Before replacing, verify the motor unit’s learn button functions correctly by testing with a remote. If remotes work but the keypad consistently fails despite fresh batteries and correct procedure, replacement is likely necessary.
Conclusion
Mastering how to set pin for Liftmaster garage door opener empowers you to maintain secure, reliable access to your home without costly service calls. By identifying your model correctly, following the precise sync sequence, and adhering to security best practices, you transform a potentially frustrating task into a simple routine maintenance item. Remember that patience during the programming phase—especially holding ENTER long enough—is usually the difference between success and repeated failure.
Your garage door is often the largest entry point to your home; keeping its access system updated and functional is a fundamental aspect of homeownership. If this guide helped you regain access or improve your security, please share it on social media to help fellow homeowners navigate their own LiftMaster setups. A quick post could save someone else from being locked out on a cold evening!



Leave a Reply