Introduction
Struggling to figure out how to program legacy garage door opener to car? You are not alone; millions of US homeowners face this exact hurdle when upgrading their vehicles while wanting to keep their trusted, older garage systems. This friendly, step-by-step guide will walk you through the process safely and efficiently, ensuring you regain seamless, push-button access to your garage in just a few minutes.
Can You Really Program a Legacy Garage Door Opener to a Modern Car?
Yes, you absolutely can, but success depends on understanding the technology inside your garage. Older garage door openers (typically manufactured before 2011) often use “fixed code” or early “rolling code” technology operating on 300 MHz to 400 MHz frequencies. Modern vehicles, equipped with systems like HomeLink or Car2U, are designed to be backward compatible.
According to industry data, over 70% of legacy garage door openers can be successfully synced with modern vehicles using built-in universal transceivers or an inexpensive visor-clip receiver. The key is identifying whether your opener uses a “Learn” button or older DIP switches. For a deeper technical understanding of how these security protocols evolved, you can explore the history of garage door opener technology on Wikipedia.
What You Need Before You Start Programming
Preparation is the secret to a frustration-free experience. Gather these items before you begin:
- Your Vehicle: Ensure it has built-in HomeLink buttons (usually on the rearview mirror or sun visor) or a universal clip-on remote.
- A Sturdy Ladder: You will need safe access to the legacy garage door motor unit mounted on the ceiling.
- Owner’s Manuals: Keep the manuals for both your car and the garage door opener handy for model-specific nuances.
- A Helper: Having a second person to hold the ladder, press buttons, and observe the door’s reaction is highly recommended for safety and efficiency.
Step-by-Step: How To Program Legacy Garage Door Opener To Car
Follow these concrete, actionable steps to establish a secure connection between your vehicle and your garage.
Step 1: Identify Your Opener’s Technology
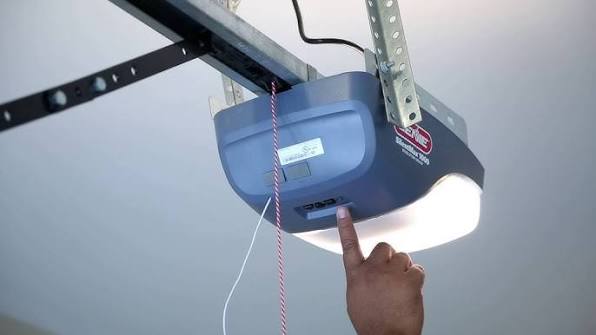
Climb the ladder and inspect the back or side of your garage door motor unit.
- Learn Button System: Look for a small, colored button (usually yellow, purple, red, or green) near a hanging antenna wire. This indicates a rolling-code or Security+ system.
- DIP Switch System: If there is no Learn button, open the battery compartment of your old handheld remote. If you see a row of 8 to 12 tiny switches, you have a fixed-code DIP switch system.
Step 2: Clear Your Car’s Existing Memory
Before programming a new device, you must wipe the slate clean.
- Sit in your car with the ignition turned to the “ON” or “Accessory” position.
- Press and hold the two outer HomeLink buttons simultaneously.
- Hold them for 10 to 20 seconds until the indicator light changes from a solid glow to a rapid, flashing pattern. Release the buttons immediately.
Step 3: Execute the Programming Sequence
For “Learn Button” Openers:
- Position your car 2 to 4 feet directly in front of the garage door, keeping the engine running.
- Press and hold your desired HomeLink button in the car.
- While holding the car button, have your helper press and hold the “Learn” button on the garage motor unit.
- Continue holding both buttons for 20 to 30 seconds. Watch the car’s indicator light closely. When it changes from a slow blink to a rapid, solid flash, release both buttons.
For “DIP Switch” Openers:
- Manually match the pattern of the tiny switches inside your old handheld remote to the switches inside the new universal car remote (or visor clip-on unit).
- Ensure every single switch is in the exact same “up” or “down” position.
- Test the remote from inside the car.
Step 4: Test the Connection
Press the newly programmed button in your car three times in succession. The garage door should activate smoothly. If it does, congratulations! You have successfully learned how to program a legacy garage door opener to your car.
Legacy Garage Door Opener vs. Modern Systems: A Quick Comparison
Understanding the differences helps set realistic expectations for your setup.
| Feature | Legacy Opener (Pre-2011) | Modern Opener (Post-2011) |
|---|---|---|
| Security Type | Fixed Code or Early Rolling Code | Advanced Rolling Code (Security+ 2.0) |
| Frequency | 300 MHz – 400 MHz | 315 MHz or 390 MHz |
| Programming Method | DIP Switches or Basic Learn Button | Smart Learn Button or Wi-Fi App Control |
| Car Compatibility | Requires careful matching or a bridge | Native, seamless HomeLink/Car2U support |
Troubleshooting Common Programming Issues
Even with careful steps, hiccups can occur. Here is how to resolve the most frequent problems:
- The car light flashes, but the door does not move.
Solution: Your legacy opener might be a Chamberlain/LiftMaster Security+ 1.0 model (with a purple or red Learn button). These often require a “compatibility bridge” or repeater (like the HomeLink Wireless Vehicle Interface) to translate the modern car signal to the older motor. - The “Learn” button is not responding.
Solution: Ensure you are pressing the correct button. Some units have a separate “Lock” or “Reset” button. Also, verify the motor unit is receiving power and the bulb is not burnt out (some units disable learning if the bulb is faulty). - The remote only works when I am parked directly in front of the garage.
Solution: This indicates weak signal transmission. Check the antenna wire on the garage motor unit and ensure it is hanging straight down, unobstructed by metal shelving or foil-backed insulation.
Frequently Asked Questions (FAQ)
Q1: How do I know if my car has a built-in garage door opener?
A: Look at your rearview mirror, sun visor, or overhead console. You will typically see three blank or labeled buttons (sometimes with a garage door icon). If they are blank, they are likely unprogrammed HomeLink or Car2U buttons. Check your vehicle’s owner’s manual for confirmation.
Q2: Can I program a legacy garage door opener to a car without a HomeLink system?
A: Yes. You can purchase a universal, battery-powered visor-clip remote (such as those from Chamberlain or Genie). You simply program this standalone remote to your legacy opener using the DIP switch or Learn button method, and keep it clipped to your sun visor.
Q3: Why does my newly programmed car remote only work when I am very close to the garage?
A: This is usually caused by signal interference or a poorly positioned antenna. Ensure the garage door opener’s antenna wire is hanging vertically and is not wrapped around the motor or blocked by metal objects.
Q4: Is it safe to use a legacy garage door opener with modern rolling code cars?
A: It is generally safe, but fixed-code legacy systems are more vulnerable to “code grabbing” by thieves. If your opener uses DIP switches, consider upgrading to a modern rolling-code opener for enhanced security, even if the car integration works fine.
Q5: What should I do if I lost the manual for my old garage door opener?
A: Locate the model number and serial number, which are almost always printed on a sticker on the back or side of the motor unit. Search this exact model number online, and you will easily find a digital PDF of the manufacturer’s manual.
Conclusion
Learning how to program legacy garage door opener to car does not have to be a daunting technical challenge. By identifying your opener type, clearing your car’s memory, and following a precise programming sequence, you can restore the ultimate convenience of push-button garage access. This simple DIY task saves you the cost of a full garage system upgrade while maintaining the security and functionality you need.
Did this guide help you get your garage door working with your car? Share this article on Facebook, Twitter, or Pinterest to help a friend or family member who might be struggling with their own garage door setup!



Leave a Reply