Introduction
Struggling to get your car and garage to communicate? You are not alone. Learning how to program Liftmaster garage door opener to vehicle can seem daunting at first, but with the right steps, you can sync them seamlessly in just a few minutes. Let’s get your garage door opening smoothly with the simple push of a button, saving you time and hassle every single day.
Why Syncing Your LiftMaster to Your Vehicle Matters
According to the International Door Association (IDA), over 70% of homeowners in the United States use their garage door as their primary home entrance. This makes a reliable connection between your vehicle and your garage not just a luxury, but a daily necessity.
When you successfully sync your car to your LiftMaster opener, you eliminate the need to fumble for a separate remote in the dark or rain. Furthermore, modern rolling-code technology ensures that every time you press the button, a new, encrypted code is sent. This drastically reduces the risk of code theft, enhancing your home’s overall security.
How To Program Liftmaster Garage Door Opener To Vehicle: Step-by-Step
Before diving into the programming process, it is essential to gather the right tools and information. A smooth setup requires minimal preparation but guarantees a frustration-free experience.
What You Need Before You Start:
- Your vehicle’s owner’s manual (to locate the built-in programmable buttons, often branded as HomeLink or Car2U).
- A sturdy step ladder to safely reach the LiftMaster motor unit.
- Your existing LiftMaster handheld remote (helpful for verifying the current frequency).
- A fresh car battery (ensure your vehicle’s battery voltage is above 12.6 volts for optimal signal transmission).
Step 1: Identify Your Vehicle’s Programmable System
Most modern vehicles in the US come equipped with HomeLink, a universal transceiver built into the rearview mirror or sun visor. Some older or specific models might use Car2U. Check your vehicle’s manual to confirm the system type and locate the three programmable buttons.
Step 2: Clear Old Codes from Your Vehicle
If your car is pre-owned or previously programmed, old signals can interfere with the new setup.
- Turn your vehicle’s ignition to the “ON” or “ACCESSORY” position.
- Press and hold the two outer programmable buttons simultaneously.
- Keep holding them for 20 seconds until the indicator light begins to flash rapidly.
- Release the buttons. The system is now cleared and ready for new programming.
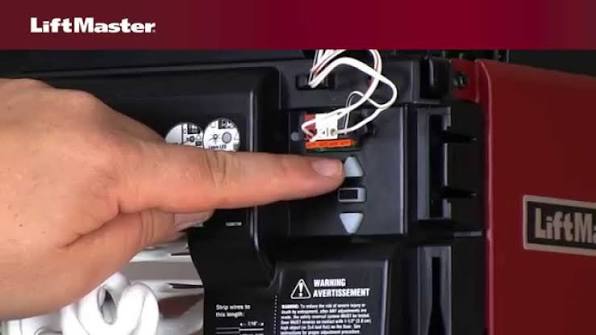
Step 3: Put Your LiftMaster into “Learning Mode”
Locate the LiftMaster motor unit mounted on your garage ceiling.
- Climb your step ladder and find the “Learn” button on the back or side of the motor unit.
- Press and release the Learn button. Do not hold it down.
- An adjacent LED light will illuminate or blink, indicating the unit is in learning mode. You typically have 30 seconds to complete the next step before it times out.
Step 4: Sync the Car Button to the LiftMaster
- Sit in your vehicle, parked just outside the garage.
- Hold the chosen programmable button in your car 1 to 3 inches away from the LiftMaster handheld remote (or directly toward the motor unit if the remote is unavailable).
- Press and hold the car button.
- Watch the LiftMaster motor unit’s LED light. When it blinks or turns off, release the car button immediately. This usually takes between 30 to 60 seconds.
Step 5: Test the Connection
To finalize the rolling-code synchronization:
- Press the newly programmed car button three times in succession.
- Observe the garage door. It should activate and close or open smoothly.
- If it works, congratulations! You have successfully learned how to program Liftmaster garage door opener to vehicle.
Understanding LiftMaster Learn Button Colors
Not all LiftMaster openers are identical. The color of the Learn button dictates the security protocol and frequency. Refer to this quick guide:
| Learn Button Color | Security Technology | Frequency | Compatibility Note |
|---|---|---|---|
| Yellow / Orange | Security+ 2.0 | 315 MHz | Most common in models post-2011. Highly secure. |
| Purple | Security+ 2.0 | 390 MHz | Common in newer MyQ-enabled systems. |
| Red | Security+ 1.0 | 390 MHz | Older models (1997–2005). May require a compatible remote. |
| Green | Legacy (Pre-1997) | 300-400 MHz | Discontinued. May require a universal repeater for modern cars. |
Pro Tip: If your LiftMaster has a green Learn button, modern HomeLink systems may struggle to connect directly due to outdated radio frequencies. In this case, consulting a professional or upgrading the motor unit is recommended.
Troubleshooting Common Programming Issues
Even with careful steps, hiccups can occur. Here is a quick troubleshooting matrix to resolve the most frequent pairing failures:
| Issue | Probable Cause | Actionable Solution |
|---|---|---|
| Car button flashes, but door doesn’t move | Signal didn’t reach the motor unit. | Move the car closer (within 5 feet). Ensure no large metal objects block the signal. |
| Learn button LED turns off immediately | The 30-second window expired. | Press the Learn button again and immediately initiate the car button press. |
| Door moves slightly, then reverses | Safety sensor misalignment. | Check the photo-eye sensors at the bottom of the garage tracks. Ensure they are clean and aligned (solid green light). |
| HomeLink indicator stays solid, no blink | Old code wasn’t cleared properly. | Repeat Step 2, holding the outer buttons for a full 20+ seconds until the rapid flash occurs. |
For a deeper understanding of the underlying radio frequency and rolling-code technology used in these systems, you can refer to the comprehensive technical overview on Garage door opener systems.
FAQ Section
Q1: How do I know if my LiftMaster is compatible with my car?
A: Most LiftMaster openers manufactured after 1993 are compatible with modern HomeLink or Car2U systems. Check your motor unit’s Learn button color. Yellow, purple, and red buttons indicate Security+ technology, which pairs seamlessly with 99% of modern vehicles.
Q2: Why won’t my LiftMaster garage door opener program to my car?
A: The most common reasons are an expired learning window (you took longer than 30 seconds), interference from LED light bulbs in the garage (which can emit radio frequency noise), or a weak car battery. Try replacing the garage opener’s light bulb with an incandescent one temporarily during setup.
Q3: Do I need to reset my LiftMaster before programming it to a new vehicle?
A: No, you do not need to reset the entire motor unit. However, you must clear the old codes from your vehicle’s HomeLink system (as detailed in Step 2) to prevent signal conflicts. The LiftMaster can store multiple remote codes simultaneously.
Q4: Can I program a LiftMaster opener to my car without a handheld remote?
A: Yes. While having a handheld remote makes it easier to clone the signal, you can program the car button directly to the motor unit. Simply press the Learn button on the motor, then press and hold the car button until the motor’s LED blinks, indicating a successful sync.
Q5: Does programming my car to the garage door opener drain my car battery?
A: No. The HomeLink system only draws a negligible amount of power when you actively press the button. It remains in a low-power sleep state otherwise, having no measurable impact on your vehicle’s battery life.
Conclusion
Mastering how to program Liftmaster garage door opener to vehicle is a straightforward process that pays off in daily convenience and enhanced home security. By identifying your system, clearing old codes, and following the precise 30-second learning window, you can achieve a flawless sync. No more braving the rain to find a lost remote—just seamless, secure access at the touch of a button.
Did you find this guide helpful? Share this article with your friends and family on Facebook, Twitter, or Pinterest to help them conquer their garage door setup today! If you have any unique tips or questions, drop them in the comments below—we love hearing from our community.



Leave a Reply