Introduction
There is nothing quite as frustrating as standing in your driveway, pressing your remote repeatedly, only to realize your garage door opener has stopped responding. Whether you have moved into a new home, lost a remote, or simply want to boost your home security, knowing how to reset code on Clicker garage door opener systems is an essential skill for any homeowner. This guide provides clear, empathetic, and professional instructions to get your garage secure and functional again without the need for expensive service calls.
Understanding Your Clicker Garage Door Opener System
Before diving into the reset process, it is vital to understand what you are working with. Clicker (often associated with Chamberlain or LiftMaster) openers typically use rolling code technology. According to Wikipedia, modern rolling code systems change the access code every time the remote is used, preventing thieves from “grabbing” your signal. When you reset the system, you are essentially clearing this digital handshake and establishing a new, secure connection between your motor unit and your transmitters.
Why Would You Need to Reset Your Code?
- Moving into a New Home: Previous owners or tenants may still have active remotes.
- Lost or Stolen Remote: Prevent unauthorized entry immediately.
- Malfunctioning Keypad: The wireless entry pad isn’t syncing correctly.
- Adding New Devices: Integrating smart home hubs or additional car visor clips.
- Security Upgrade: Routine maintenance to ensure old codes are purged.
Step-by-Step: How To Reset Code On Clicker Garage Door Opener
This tutorial covers the universal method for most Clicker/Chamberlain/LiftMaster units manufactured after 1993. Always prioritize safety; keep hands clear of moving parts during this process.
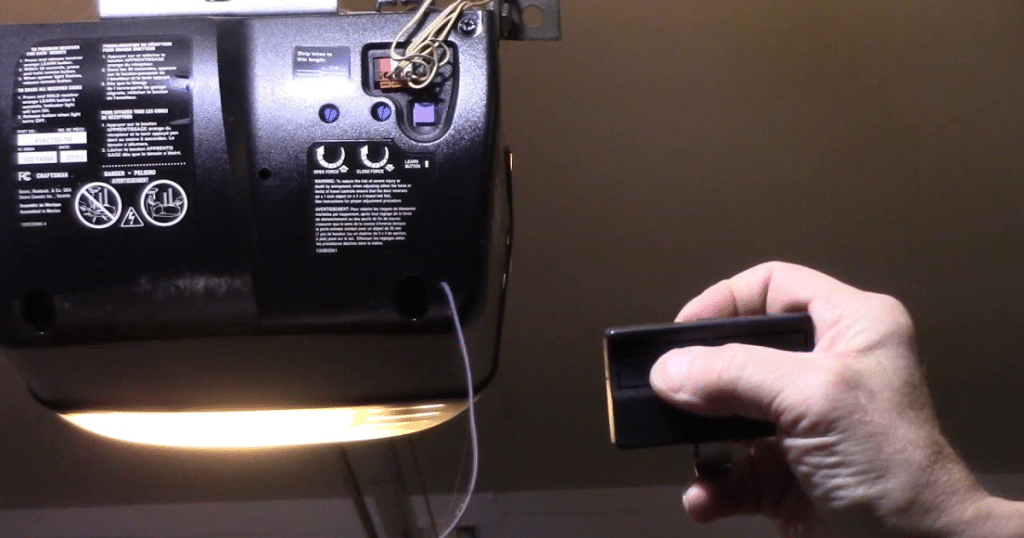
Step 1: Locate the Learn Button
Find the motor unit hanging from your ceiling. Look for a square button labeled “Learn” or “Smart.” It is usually located on the back or side panel near the antenna wire. The color matters:
- Yellow: Security+ 2.0 (newer models)
- Purple, Red, Orange, or Green: Older Security+ models
Step 2: Clear All Existing Codes
To perform a full factory reset of the receiver memory:
- Press and hold the Learn button for approximately 6 to 10 seconds.
- Watch the LED indicator light next to the button. It will turn on, then go out completely.
- Release the button once the light goes off.
- Result: All remotes, keypads, and smart accessories are now erased. Test your existing remotes to confirm they no longer work.
Step 3: Reprogram Your Primary Remote
Now that the slate is clean, re-establish access:
- Briefly press and release the Learn button. The LED will illuminate steadily for 30 seconds.
- Within those 30 seconds, press and hold the button on your remote you wish to program.
- Hold until the motor unit lights flash or you hear two clicks.
- Release the remote button. Test immediately.
Step 4: Program the Wireless Keypad
If you use an exterior PIN pad:
- Press the Learn button on the motor unit again (LED stays lit for 30 seconds).
- Go to the keypad and enter your desired 4-digit PIN.
- Press and hold the ENTER button.
- Wait for the motor unit to flash/click. Release ENTER.
- Test the new PIN.
⚠️ Safety Note: Never leave the ladder unattended while programming overhead units. Ensure the garage door area is clear of people and pets before testing operation.
Troubleshooting Common Reset Issues
Even professionals encounter hiccups. Use this table to diagnose problems quickly:
| Symptom | Likely Cause | Solution |
|---|---|---|
| Learn light doesn’t turn on | Power issue or burnt-out LED | Check breaker; verify unit is plugged in |
| Remote programs but won’t open door | Battery weak or frequency mismatch | Replace battery; verify remote compatibility |
| Keypad accepts PIN but door doesn’t move | Wiring issue or limit switch error | Inspect wall console wiring; check safety sensors |
| Codes reset themselves randomly | Logic board failure or power surge | Install surge protector; consider board replacement |
| Only works when holding button close | Antenna damage or RF interference | Extend antenna wire; remove nearby LED bulbs |
Expert Insight on Battery Maintenance
Industry data suggests that over 60% of garage door opener service calls are resolved simply by replacing batteries. Before assuming your logic board is fried after a failed reset, install fresh alkaline batteries in both your remote and keypad. Weak voltage often mimics programming failures because the signal strength drops below the receiver’s threshold during the handshake process.
Advanced Tips for Enhanced Security
Resetting your code is just the baseline. True security involves layered protection:
- Change Codes Annually: Treat your garage code like a password. Rotate it every 12 months.
- Use Unique PINs: Avoid birthdays, addresses, or sequential numbers like “1234.”
- Enable Vacation Mode: Most Clicker units have a vacation lock switch on the wall console that disables all wireless access while you travel.
- Upgrade to Smart Integration: Consider adding myQ or similar Wi-Fi hubs that provide real-time alerts and temporary guest codes, eliminating the need for physical resets when giving access to contractors.
Frequently Asked Questions (FAQ)
Q1: Will resetting my Clicker opener erase my wall-mounted control panel?
Generally, no. The hardwired wall console operates independently of the wireless receiver memory. However, if your wall panel has integrated wireless features or is a smart multi-function panel, it may need reprogramming. Standard push-button consoles should continue working normally after a Learn button reset.
Q2: How many remotes can I program after resetting?
Most Clicker/Chamberlain openers support up to 8 remotes plus 1 keypad, though some newer Security+ 2.0 models handle up to 24 devices. Check your specific model’s manual for exact limits. After a full reset, you must reprogram every device you want to use; partial additions aren’t possible post-reset.
Q3: My Learn button is blinking continuously—what does this mean?
A continuously blinking Learn light typically indicates misaligned safety sensors or an obstruction detected in the door’s path. This is a safety lockout feature. Before attempting any code reset, inspect the photo-eye sensors at the bottom of your door tracks. Ensure they face each other directly, lenses are clean, and nothing blocks the beam. Solid lights indicate proper alignment.
Q4: Can I reset the code without accessing the motor unit?
Unfortunately, no. There is no remote-only factory reset for Clicker openers. Physical access to the Learn button on the motor head is mandatory for clearing memory. If your unit is mounted extremely high or in an inaccessible location, hire a professional technician rather than risking injury on unstable ladders.
Q5: What if my Clicker opener doesn’t have a Learn button?
Units manufactured before 1993 use DIP switches instead of Learn buttons. These require manually matching tiny switch positions inside both the remote and motor unit. If you own a pre-1993 model, we strongly recommend upgrading to a modern rolling-code system for significantly better security and convenience. Legacy DIP systems are vulnerable to code grabbing and lack current safety standards.
Q6: Does resetting affect my smart home integration?
Yes. Resetting clears all paired devices, including Wi-Fi hubs, vehicle built-in transmitters (HomeLink), and third-party integrations. You will need to re-pair each smart device individually after completing the basic remote and keypad programming. Consult your smart hub’s documentation for specific re-linking procedures.
Conclusion
Mastering how to reset code on Clicker garage door opener systems empowers you to maintain both convenience and security in your home. By following these steps, you eliminate unauthorized access risks and restore reliable operation without costly service fees. Remember: regular code rotation and battery maintenance are small investments that yield significant peace of mind.
Found this guide helpful? Share it with friends, family, or neighbors who might be struggling with their garage door opener! Tag us on social media or send this link to someone who just moved into a new home. Secure garages make safer communities—spread the knowledge today! 🔐🏡



Leave a Reply