Have you ever stood in the rain, frantically pressing the buttons on your garage remote, only to watch your car remain stuck outside? It is a frustrating experience that many homeowners face when their wireless clicker loses synchronization with the main unit. Learning how to program a clicker wireless garage door opener is a simple skill that can save you time, money, and a lot of stress.
In this guide, we will walk you through the exact steps to get your remote working again. Whether you have a new remote or an old one that suddenly stopped responding, these universal methods cover most major brands available in the US market.
Why Does My Garage Door Remote Stop Working?
Before diving into the programming steps, it helps to understand why disconnection happens. Most modern garage door openers use rolling code technology for security. This means the code changes every time you press the button. Occasionally, the remote and the opener fall out of sync.
Other common reasons include:
- Dead Batteries: The most frequent culprit. Even if the LED light blinks, the signal might be too weak.
- Interference: LED light bulbs in the garage can sometimes emit frequencies that interfere with radio signals.
- Locked Controls: Some openers have a “lock” feature that disables remote access temporarily.
According to industry standards, most garage door remotes operate on frequencies between 300 MHz and 400 MHz. Understanding this helps when troubleshooting interference issues. For more technical details on radio frequency allocations, you can refer to Wikipedia’s entry on Radio Spectrum.
Method 1: The Standard “Learn Button” Programming
This is the most common method for openers manufactured after 1993. Look for a small button on your motor unit (the box attached to your garage ceiling). It is usually colored yellow, red, purple, or green.
Step-by-Step Instructions
- Locate the Learn Button: Climb a sturdy ladder to reach the motor unit. Find the “Learn” or “Smart” button. It is often located near the hanging antenna wire.
- Clear Old Codes (Optional but Recommended): Press and hold the Learn button for about 6–10 seconds until the indicator light turns off. This erases all previously programmed remotes. Note: You will need to reprogram all your existing remotes if you do this.
- Press the Learn Button: Briefly press and release the Learn button. The indicator light should turn on or start blinking. You typically have 30 seconds to complete the next step.
- Program the Clicker: Within those 30 seconds, go to your wireless clicker. Press and hold the button you want to use for three seconds. Release it.
- Test the Connection: The light on the motor unit should blink or turn off, indicating success. Test the remote by standing clear of the door and pressing the button.
Pro Tip: If the light on the motor unit does not blink, try replacing the battery in your remote before attempting again.
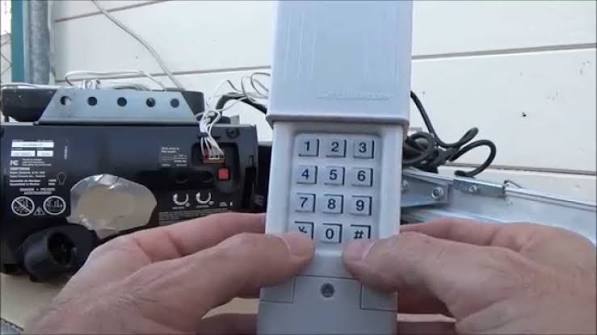
Method 2: Programming Without a Ladder (Keypad Method)
If you cannot reach the motor unit safely, some models allow programming via an external wireless keypad. This method varies by brand but generally follows this logic:
- Enter your existing PIN code on the keypad.
- Press and hold the “Program” or “Learn” button on the keypad.
- While holding the button, enter your desired new PIN.
- Release the button and test the new code.
Note: This method does not always work for handheld clickers, but it is useful for keyless entry systems.
Brand-Specific Nuances: Chamberlain, LiftMaster, and Genie
While the general process is similar, major US brands have slight variations. Here is a quick comparison to help you identify your system.
| Brand | Learn Button Color | Common Frequency | Special Note |
|---|---|---|---|
| Chamberlain | Yellow, Purple, or Red | 315 MHz / 390 MHz | Yellow buttons are older; Purple is newer Security+ 2.0. |
| LiftMaster | Yellow, Purple, or Red | 315 MHz / 390 MHz | Same parent company as Chamberlain; steps are identical. |
| Genie | Red, Purple, or Orange | 315 MHz | Orange buttons indicate Intellicode technology. |
| Craftsman | Yellow or Red | 315 MHz | Older models may use DIP switches instead of a learn button. |
Identifying Your Model
Check the back of your motor unit for a label. It will list the model number and frequency. If you see DIP switches (tiny rows of plastic switches), you have an older fixed-code system. In this case, you must match the switch positions on the remote to the motor unit exactly.
Troubleshooting Common Programming Issues
Even with careful following of instructions, things can go wrong. Here are solutions to the most frequent problems.
The Remote Light Blinks, But the Door Doesn’t Move
This usually indicates a signal issue rather than a programming failure.
- Check the Antenna: Ensure the wire antenna hanging from the motor unit is not wrapped around metal or buried in insulation. It needs to hang freely.
- Battery Check: Use a multimeter to ensure the battery provides at least 3 volts. A weak battery can send a signal that the opener receives but cannot decode properly.
The Learn Light Does Not Turn On
If pressing the Learn button yields no response:
- Power Cycle: Unplug the garage door opener for 30 seconds, then plug it back in. This resets the logic board.
- Lock Mode: Check if the wall console has a “Lock” button pressed. This disables remote functions for security.
Interference from LED Bulbs
A surprising number of homeowners face issues due to garage lighting. Cheap LED bulbs can emit electromagnetic noise on the same frequency as your remote.
- Solution: Try turning off the garage lights and testing the remote. If it works, replace the bulbs with high-quality, shielded LEDs or incandescent bulbs.
Safety First: Important Precautions
Programming your garage door opener involves working near heavy machinery. Always prioritize safety.
- Keep Clear: Never stand under the garage door while testing the remote.
- Sensor Check: Ensure the safety eyes (sensors near the floor) are aligned and clean. The door should reverse immediately if something breaks the beam.
- Secure Ladders: If using a ladder, ensure it is on stable ground. Have someone spot you if possible.
FAQ: Frequently Asked Questions
Q1: Can I program a universal clicker to any garage door opener?
A: Most universal remotes work with major brands like Chamberlain, LiftMaster, Genie, and Craftsman. However, they may not be compatible with very old models (pre-1993) or proprietary systems like some Stanley or Wayne Dalton units. Always check the compatibility list on the remote’s packaging.
Q2: How do I know if my garage door opener uses rolling codes?
A: If your opener was manufactured after 1993, it almost certainly uses rolling codes. Look for a “Learn” button on the motor unit. If it has DIP switches instead, it uses fixed codes. Rolling codes are more secure because the code changes with every use.
Q3: Why does my remote only work when I am very close to the garage?
A: This is a classic sign of a weak battery or interference. Replace the battery first. If the issue persists, check for LED light bulb interference or obstructions blocking the antenna.
Q4: Can I program multiple clickers to the same opener?
A: Yes. Most modern openers can store up to 8–10 different remote codes. Simply repeat the programming steps for each additional remote. Do not clear the memory unless you want to erase all existing remotes.
Q5: What should I do if I lost my original remote?
A: You can still program a new remote as long as you have access to the motor unit’s Learn button. If you cannot access the motor unit, you may need to call a professional technician to reset the system safely.
Conclusion
Learning how to program a clicker wireless garage door opener empowers you to handle minor technical glitches without calling a technician. By identifying your brand, locating the Learn button, and following the synchronized steps, you can restore functionality in minutes. Remember to check your batteries and antenna placement if issues persist.
Did this guide help you get your garage door working again? Share this article with friends or neighbors who might be struggling with their remotes. Stay safe, and enjoy the convenience of a smoothly operating garage!


Leave a Reply