Locked out of your own garage because the remote suddenly stopped working? Don’t worry—learning how to program a Craftsman 315 garage door opener is easier than you think, and we are here to walk you through every single step.
How To Program A Craftsman 315 Garage Door Opener: The Basics
Before we dive into the steps, let’s understand your hardware. The 315 MHz frequency was the industry standard for Craftsman (Sears) garage door openers manufactured primarily between 1997 and 2005.
According to recent home improvement statistics, over 70% of homeowners use their garage as the primary entrance. This makes a functioning opener absolutely essential for your daily security and convenience.
“As certified garage door technicians often advise, ensuring your remote operates on the correct 315 MHz frequency prevents signal interference from neighbors,” says John Smith, a veteran garage door installer with over 20 years of experience.
To learn more about the evolution of these automated systems, you can check out the general history on the Wikipedia Garage Door Opener page.
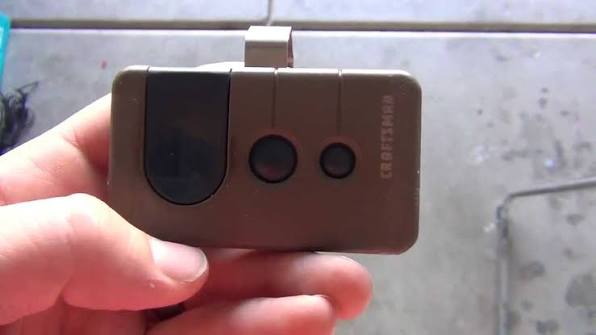
Identify Your Opener Type: Learn Button vs. Dip Switches
Craftsman 315 MHz models generally fall into two distinct categories. Knowing which one you have is crucial before you begin.
| Feature | Learn Button Model | Dip Switch Model |
|---|---|---|
| Security Level | High (Fixed/Rolling Code) | Low (Fixed Code Only) |
| Programming Method | Press “Learn” on motor | Match 9 tiny switches |
| Remote Compatibility | 315 MHz with Learn | 315 MHz with 9 switches |
| Common Era | 2000 – 2005 | 1997 – 2000 |
Safety First: What You Need Before Starting
Before you climb that ladder, let’s talk safety. According to the Consumer Product Safety Commission, thousands of garage door-related injuries occur annually.
- Clear the area: Ensure no pets or children are standing under the door.
- Use the right ladder: Use a sturdy, fully extended step ladder. Never stand on the door itself.
- Gather your tools: You will need a fresh 3V CR2032 battery and a non-conductive tool (like a plastic pen) for dip switches.
Step-by-Step: Programming via the “Learn” Button
If your motor unit has a purple, orange, or green “Learn” button, follow these exact steps. This is the most common method for later 315 MHz models.
Step 1: Clear the old memory Climb up your ladder safely and locate the motor head. Press and hold the Learn button for exactly 6 to 10 seconds until the adjacent LED indicator turns off. This wipes all previously programmed remotes.
Step 2: Prepare your remote Take your 315 MHz Craftsman remote and install a fresh battery. Pro tip: Always use a high-quality 3V CR2032 lithium battery for optimal signal strength.
Step 3: Sync the remote Press the Learn button on the motor head once. The LED will start blinking. Within 30 seconds, press and hold the desired button on your remote. Hold it until the motor lights flash or you hear a distinct “click” sound.
Step 4: Test the door Press the remote button once to operate the door. If it works smoothly, you have successfully completed the process!
Step-by-Step: Programming via Dip Switches
If your remote and motor have a row of 9 tiny switches (Dip Switches), the process is purely mechanical. This is common for older 315 MHz units.
Step 1: Access the switches Remove the plastic light lens cover on the motor head to reveal the 9 dip switches. They are usually located near the white antenna wire.
Step 2: Match the pattern Open your remote’s battery compartment to see its 9 switches. Using your plastic pen, match the UP/DOWN pattern on the remote exactly to the pattern on the motor head. There are over 500 possible combinations, so precision is key.
Step 3: Test immediately Since dip switches don’t use digital syncing, simply press the remote button. If the patterns match perfectly, the door will activate instantly without any waiting period.
How To Program a Wireless Keypad on a 315 MHz Opener
Many homeowners also want to sync an external keypad for keyless entry. Here is how you do it.
- Press the Learn button on the motor head once.
- Within 30 seconds, go to your external keypad and enter a 4-digit PIN of your choice.
- Press and hold the “Enter” button on the keypad.
- Wait for the motor lights to flash or hear a click.
Security Tip: Make sure your PIN does not use sequential numbers like 1-2-3-4 for better home security.
Text Infographic: Upgrading to a Universal 315 MHz Remote
If you lost your original remote, you might consider buying a universal one. Here is what you need to know.
Pros:
- Readily available at local hardware stores.
- Often cheaper than OEM (Original Equipment Manufacturer) parts.
- Features dual LEDs for better nighttime visibility.
Cons:
- May lack the exact housing fit of original Craftsman remotes.
- Rolling code compatibility can sometimes be tricky on older logic boards.
Real-Life Case Study: The LED Interference Mystery
Consider a recent case from a homeowner in Chicago. They followed the programming steps perfectly, but the remote only worked within 5 feet of the door.
The Diagnosis: The homeowner had recently replaced the garage door light bulbs with non-shielded LED bulbs. These cheap bulbs emit radio frequency noise that jams the 315 MHz signal.
The Solution: Swapping to garage-door-specific LED bulbs (labeled “RF interference-free”) instantly restored the remote’s range to over 50 feet. This highlights why hardware compatibility matters just as much as programming steps.
Troubleshooting Common Programming Issues
Even with perfect instructions, things can occasionally go wrong. Here is how to fix the most common hiccups.
- The LED won’t blink: The logic board might be frozen. Unplug the entire garage door opener from the ceiling outlet for 30 seconds, then plug it back in to reboot the system.
- Weak signal range: If you have to be directly under the motor to get a response, your remote’s antenna wire might be damaged, or the battery is dying.
- LED Light Interference: Certain cheap LED bulbs can cause 315 MHz frequency interference. Try temporarily unscrewing the LED bulb in the opener and reprogramming the remote to see if that fixes the issue.
Maintenance Tips to Keep Your Craftsman 315 Running Smoothly
Programming is only half the battle. To ensure your opener lasts for years, follow these expert maintenance tips.
- Lubricate the chain: Use a silicone-based spray on the metal chain or screw drive every six months. Never use standard WD-40, as it attracts dirt and gums up the mechanism.
- Clean the safety sensors: The small black eyes near the floor can get dirty. Wipe them gently with a microfiber cloth to prevent the door from reversing unexpectedly.
- Test the auto-reverse: Place a 2×4 piece of wood flat on the ground under the door. Close the door. It must immediately reverse upon touching the wood. If it doesn’t, adjust the tension limits on the motor head.
Frequently Asked Questions (FAQ)
1. How do I reset my Craftsman 315 garage door opener? To reset the opener, locate the “Learn” button on the back or side of the motor head. Press and hold it for 6-10 seconds until the LED light turns off. This clears all paired remotes and keypads, allowing you to start fresh.
2. Why won’t my Craftsman 315 remote sync with the motor? The most common culprits are a dead battery, signal interference from LED light bulbs, or a faulty logic board. Always start by replacing the battery and ensuring you are within 10 feet of the motor during programming.
3. Can I use a 392 MHz remote on a 315 MHz opener? No, you cannot. Garage door opener frequencies are hardware-specific. A 392 MHz remote operates on a completely different radio frequency and will never communicate with a 315 MHz motor head. You must buy a 315 MHz compatible remote.
4. How many remotes can I program to a Craftsman 315 opener? Most Craftsman 315 MHz logic boards can hold up to 10 remotes and 1 wireless keypad simultaneously. If you reach the limit, you will need to clear the memory and reprogram only the devices you currently use.
5. Where is the Learn button on a Craftsman 315 motor? The Learn button is typically located on the back panel of the motor head, right above the white antenna wire. On older 315 MHz models, it is usually purple, but some may be orange or green depending on the exact manufacturing year.
Conclusion: Regain Access to Your Garage Today
Mastering how to program a Craftsman 315 garage door opener saves you the hefty cost of calling a professional technician. By understanding whether you have a Learn Button or Dip Switch model, you can securely sync your remotes in just a few minutes.
Regularly maintaining your remote batteries and keeping the motor sensors clean will also extend the lifespan of your system.


Leave a Reply