Have you ever stood in your driveway, pressing the button on your new remote only to watch your garage door remain stubbornly closed? It is a frustrating experience that many homeowners face after buying a replacement remote or installing a new LiftMaster unit. If you are wondering how to program a LiftMaster garage door opener, you are not alone. This guide will walk you through the process clearly and safely, ensuring you regain control of your garage in no time.
Understanding Your LiftMaster Model
Before diving into the buttons and lights, it is crucial to identify which type of LiftMaster opener you have. LiftMaster has been a leader in the garage door industry for decades, offering various models with different programming protocols. The two most common types are those with a “Learn” button and older models that use DIP switches.
Most modern LiftMaster openers manufactured after 1993 use a security+ or Security+ 2.0 system. These systems rely on rolling codes, which change every time you use the remote to prevent hacking. Identifying your model ensures you follow the correct steps, saving you time and potential frustration.
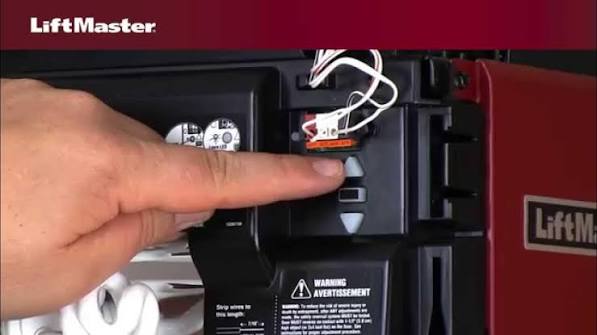
The “Learn” Button Location
The “Learn” button is typically located on the back or side of the motor unit hanging from your garage ceiling. It is usually colored yellow, purple, orange, or red. The color of this button often dictates the specific programming frequency and protocol. For a detailed history of garage door automation standards, you can refer to Wikipedia’s entry on garage door openers.
Step-by-Step: Programming a Standard Remote Control
Programming a standard handheld remote is the most common task. Whether you have lost your original remote or bought an additional one for a second car, the process is straightforward if you follow these steps.
Step 1: Locate the Learn Button
Climb a sturdy ladder to access the motor unit. Look for the “Learn” button near the antenna wire. Note the color of the button, as this may be relevant for troubleshooting later.
Step 2: Clear Old Codes (Optional but Recommended)
If you are reprogramming due to security concerns or lost remotes, it is wise to clear the memory. Press and hold the “Learn” button for about 6–10 seconds until the indicator light turns off. This erases all previously programmed remotes and keypads, so you will need to reprogram them all.
Step 3: Initiate Programming Mode
Press and release the “Learn” button. The indicator light will either turn on steadily or start blinking, depending on your model. You typically have 30 seconds to complete the next step before the mode times out.
Step 4: Sync the Remote
While the light is active, press and hold the button on your remote that you wish to use. Keep holding it until the motor unit’s lights blink or you hear two clicks. This confirms that the code has been accepted.
Step 5: Test the Connection
Step down from the ladder and test the remote. Press the button once. The garage door should activate. If it does not, repeat the process, ensuring you are within range and the remote has fresh batteries.
Programming a Wireless Keypad
Wireless keypads offer convenience for family members who do not carry remotes. Programming a keypad is slightly different but equally simple.
- Enter Programming Mode: Press and release the “Learn” button on the motor unit.
- Input PIN: On your wireless keypad, enter your desired 4-digit PIN.
- Confirm Entry: Press and hold the “Enter” button on the keypad.
- Wait for Signal: Watch the motor unit’s light. When it blinks or turns off, release the “Enter” button.
- Test: Enter your PIN again and press “Enter” to ensure the door operates.
Tip: Choose a PIN that is easy for you to remember but difficult for others to guess. Avoid using birth years or simple sequences like 1234.
Using the MyQ Smart App
Modern LiftMaster openers often come with Wi-Fi capabilities, allowing you to control your garage door via smartphone. The MyQ app is LiftMaster’s official platform for smart home integration.
Benefits of MyQ Integration
- Remote Access: Open or close your door from anywhere in the world.
- Activity Alerts: Receive notifications when the door is opened or closed.
- Voice Control: Compatible with Amazon Alexa and Google Assistant.
To set up MyQ, download the app from the App Store or Google Play. Create an account and follow the in-app instructions to connect your opener to your home Wi-Fi network. You will need to scan the QR code located on your motor unit or enter the serial number manually.
Troubleshooting Common Issues
Even with careful following of instructions, issues can arise. Here are some common problems and their solutions.
| Issue | Possible Cause | Solution |
|---|---|---|
| Remote not working | Dead batteries | Replace batteries with fresh ones. |
| Light not blinking | Learn mode timed out | Press the “Learn” button again and act quickly. |
| Door reverses immediately | Obstruction sensor blocked | Clean the safety eyes at the bottom of the tracks. |
| Keypad unresponsive | Wrong PIN entered | Re-enter the correct PIN or reprogram the keypad. |
Interference Problems
Garage door openers operate on radio frequencies that can sometimes interfere with other devices. LED light bulbs, especially cheap ones, can emit electromagnetic interference that disrupts the signal. If you recently changed your garage light bulbs, try switching back to incandescent or high-quality LED bulbs designed for garage openers.
Safety First: Important Precautions
When working with your garage door opener, safety should always be your top priority. Garage doors are heavy and under significant tension.
- Never attempt to adjust springs yourself. Torsion springs are extremely dangerous and should only be handled by professionals.
- Keep hands and fingers clear of moving parts during testing.
- Ensure safety sensors are aligned. The small eyes near the floor must face each other directly. If they are misaligned, the door will not close.
According to the Consumer Product Safety Commission, thousands of injuries occur annually due to garage door accidents. Proper programming and maintenance can significantly reduce these risks.
Frequently Asked Questions (FAQ)
How do I reset my LiftMaster garage door opener?
To reset your opener, locate the “Learn” button on the motor unit. Press and hold it for approximately 10 seconds until the indicator light turns off. This clears all programmed remotes and keypads, returning the unit to its factory state.
Can I program a universal remote to my LiftMaster opener?
Yes, most universal remotes can be programmed to work with LiftMaster openers. Follow the instructions provided with the universal remote, which typically involve setting dip switches or using a auto-search feature to match the frequency.
Why is my LiftMaster remote working intermittently?
Intermittent issues are often caused by weak batteries, interference from LED lights, or distance. Try replacing the batteries first. If the problem persists, check for nearby sources of interference or consider installing a range extender.
Do I need a professional to program my LiftMaster opener?
No, programming a LiftMaster opener is a DIY-friendly task that requires no special tools. However, if you encounter mechanical issues or electrical problems, it is best to consult a certified technician.
How many remotes can I program to one LiftMaster opener?
Most LiftMaster openers can store up to 8–10 remote controls and keypads. Check your specific model’s manual for the exact capacity, as older models may have lower limits.
Conclusion
Learning how to program a LiftMaster garage door opener empowers you to manage your home security and convenience effectively. Whether you are syncing a new remote, setting up a keypad, or integrating with the MyQ app, the process is designed to be user-friendly. By following the steps outlined above, you can ensure smooth operation and peace of mind.
Don’t let a disconnected remote ruin your day. Take control of your garage technology today. If you found this guide helpful, please share it with friends and family on social media who might be struggling with their own garage door setups. Your share could save someone hours of frustration!


Leave a Reply